Tag Archive: “mac”
Select Grep
Update: Now located at https://github.com/anoved/Finder-Scripts/tree/master/Select%20Grep
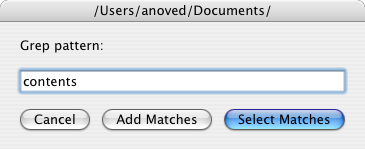
This script for the Finder is derived directly from the venerable lselect. Rather than select files whose names match a certain pattern, Select Grep selects files whose contents match a certain pattern.
Subdirectories are not searched and the pattern is not case sensitive. Extended regular expressions are supported. Compatibility with binary files has not been tested. The specific options given to grep are -liE. The script is easily edited to use different option combinations; please share any improvements.
Put the script in ~/Library/Scripts/Applications/Finder and run it to select files in the frontmost Finder window that contain the search pattern.
Posted on Saturday, December 8th, 2007. Tags: applescript, finder, mac.
Yojimbo 1.5 Script Compatibility
Today Bare Bones Software released Yojimbo 1.5, a significant update to the all-purpose desktop database. Since I’ve written quite a few little scripts for the program, I gave them each a quick test to check whether they worked with Yojimbo 1.5 and Mac OS X 10.4.11. Happily, most of them do.
Compatible
- Bookmark in Yojimbo
- Tag List
- Import Note Service
- Export with Comment Tags
- Archive Bookmarks
- Backdate Items
- Backdate Import
Updated
- Expanded Comment Fields I’ve posted a new set of
nibfiles compatible with Yojimbo 1.5.
I haven’t tried the indispensable widescreen hack yet.
Posted on Wednesday, December 5th, 2007. Tags: mac, yojimbo.
Pdftk 1.41 for Intel Macs
Pdftk is a useful utility for manipulating PDF files. A Macintosh binary of the current version was not available, except perhaps from Fink or Darwin Ports, so I built it myself. My version is not universal, but it doesn’t require a package manager, either.
Until such time as this binary is available directly from the official pdftk site, you can get it here:
Download pdftk 1.41 for Intel Macs 1MB
Note: the default pdftk Makefile settings result in a binary that still relies on gcj. Until such time as this issue is resolved, the binary probably won’t be much use!
Building pdftk requires gcj, which comes with gcc, but apparently not with Mac OS X. So, I downloaded and built GCC 4.2.2. Why 4.2.2? Because it was the most recent version.
./configure --prefix=/usr/local/gcc/4.2.2 --disable-multilib
make
make install
The --prefix option installs everything out of the way in its own little directory; I wasn’t really interested in upgrading to a new version of gcc just to build pdftk. The --disable-multilib option turns off some crap that caused build errors.
Once that’s done, building pdftk is just a matter of pointing the makefile at the new gcc stuff.
cd pdftk
# In Makefile.MacOSX, define TOOLPATH=/usr/local/gcc/4.2.2/bin/
make -f Makefile.MacOSX
make install
So that’s how you roll your own.
Posted on Monday, November 26th, 2007. Tags: mac, pdf, tcl.
strpdf
strpdf creates single-page PDF files populated with one-line text strings. The page size and string placement are configured with command line options. It is a purposely simple tool.
Download
Installation instructions and other notes are included with the downloads.
- strpdf-1.0-mac.zip (1.9M) Requires Mac OS X 10.4; untested on Mac OS X 10.5.
- strpdf-1.0-win.zip (640K) Untested, but might work at the Windows command prompt.
- strpdf-1.0-kit.zip (95K) Requires a Tclkit for your platform (8.4.16 recommended).
Usage
Strings are placed on the page with the -text option. General configuration options must be given before the first -text option. PDF data is printed to stdout, so redirection should be used to capture the result.
Here is a simple example:
strpdf -text 'Hello, world!' center middle > helloworld.pdf
The -text option has three parameters. The first is the string to print. The second and third specify the horizontal and vertical locations of the string on the page, respectively. Valid horizontal positions are left, center, and right. Valid vertical positions are top, middle, and bottom. The left, right, top, and bottom positions must each be followed by an additional parameter which specifies the distance from the indicated edge of the page to the closest side of the string.
Multiple instances of the -text option can be used to place multiple strings on the page:
strpdf -text 'Upper right' right 0.5 top 0.5 -text 'Lower left' left 0.5 bottom 0.5 > corners.pdf
The default page size is 8.5 × 11 inches (letter). The -paper option understands a few other common paper sizes, which can be listed with strpdf paper:
strpdf -paper a4 -text 'A4 FTW' center top 1 > a4.pdf
Alternatively, arbitrary page dimensions can be specified with the -width and -height options:
strpdf -width 5 -height 5 -text 'Square' center middle > square.pdf
By default, page dimensions and string position parameters are interpreted as inches. The -units option allows these values to be given in millimeters or points. The supported -units parameters are mm, pt, and in.
The -orient option provides a landscape mode that swaps the width and height of the page. This can be done manually with the -width and -height options, but the landscape option is convenient for use with preset paper sizes:
strpdf -paper legal -orient landscape -text 'Legal fine print' center bottom 0.5 > landscape.pdf
The default font is 12-point Helvetica. The -size option sets the font size (in points) and the -font option sets the font face. If given before the first -text string, these options set the default font. Given after the parameters of a particular -text option, they modify only that string:
strpdf -font Times-Roman -size 18 -text 'One' left 1 top 1 -text 'Two' center top 1 -size 24 -font Courier -text 'Three' right 1 top 1 > fonts.pdf
Valid font faces can be listed with strpdf font. Valid fonts are not necessarily available on your computer, nor are the fonts on your computer necessarily compatible with strpdf.
There is a -compress option which will compress the PDF data if given the
parameter 1, but in most cases it yields little benefit. For small files such
as the examples on this page, compression may actually result in slightly larger files.
Applications
I use strpdf in conjunction with pdftk to “stamp” otherwise static PDF documents with bits of variable text. Because these are both free command line utilities, the process is easily automated and requires no commercial software. Here a registration string is stamped on each page of a report:
strpdf -text 'Registered to John Doe' center top 0.25 > registration.pdf
pdftk document.pdf stamp registration.pdf output registered-document.pdf
Alternatively, strpdf’s output can be piped directly to pdftk:
strpdf -text 'Registered to John Doe' center top 0.25 | pdftk document.pdf stamp - output registered-document.pdf
Posted on Monday, November 26th, 2007. Tags: mac, pdf, tcl.
iTunes Library Item Transfer
My laptop has a 60 GB hard drive. I have a 500 GB external drive which houses my iTunes library and other media. I like to keep some iTunes content on my laptop, but using the Finder or the “Add to Library” file browser to move particular things between libraries gets tedious.
So, I wrote a script that makes it a little simpler. Now I can use iTunes itself to select the items to transfer instead of browsing for the actual files to pull into the target library. Might not sound like a big difference, but it seems like less fuss to me.
Here’s how it works.
Download the script (5k) and put it in ~/Library/Scripts/Applications/iTunes.
Select some items in iTunes and run the script. iTunes will quit and you will be prompted to reopen it with a different library:

Hold down the Option key as iTunes starts up to select a different library. If you’re transferring files to a new library for the first time, you could even create the new library at this point.

Once you have finished choosing a library, return to the prompt and click Transfer. The items you previously selected will be transferred to the current library and shown in a new “Transfer” playlist labeled with the current date and time.
Tested with Mac OS X 10.4.11 and iTunes 7.5 with the “Copy files to iTunes Music folder when adding to library” option enabled under Advanced→General preferences.
I reckon this could be done with iPhoto, too.
Posted on Thursday, November 15th, 2007. Tags: applescript, itunes, mac.
Lselect Toolbar Icon
Henrik Nyh has created a great Leopard-themed toolbar icon for lselect. Read his post for more information about using lselect and other useful scripts as Finder toolbar buttons with custom icons.
For your convenience, I’ve prepared a copy of the script as a tiny application ready to drag to your toolbar:
Download lselect toolbar app 15k
This is a fine time to mention that lselect really is quite useful! Use it to quickly select all the files in a folder that match a simple pattern.
Posted on Tuesday, November 6th, 2007. Tags: applescript, finder, mac.
Google Translate Service
This service provides access to Google Translate from almost anywhere you can edit text on Mac OS X. Select some text and choose “Google Translate” from your application’s Services menu. Choose a translation from the window that pops up and click Translate. The selection is replaced with its translation.
Download Google Translate Service 67 KB
I wrote this a few weeks ago. I didn’t release it because I wasn’t completely satisfied with its behavior, although I did document some of the quirks I encountered.
I haven’t resolved those issues, but I have found the service useful—or at least amusing. So, I’ve decided to release it anyway. Consider this a prototype. The main problem is that the window containing your selection loses focus after running the service. It’s got other rough edges, too.
What’s fun is the fact that you can actually translate selected portions of web pages in Safari (interesting, since the page content isn’t otherwise editable). Other tools exist to translate web pages, and the same thing can probably be accomplished with a clever JavaScript bookmarklet, but this mechanism let you translate selectively, and it works outside the browser.
This software is not endorsed or supported by Google (or by me).
Posted on Monday, October 15th, 2007. Tags: mac.
Resize Pages Graphics by Percent
Conspicuously missing from Pages is the ability to resize graphic objects by specific percents. You can say “make this graphic 2 inches wide,” but you can’t say “make this graphic 30% of its current width.” So, I wrote a script to do the dirty work for me:

It resizes the selected graphics by the specified percentage.
Download
The “Recenter” version keeps the graphic centered at its original location, which I have found to be rather annoying. Install in ~/Library/Scripts/Applications/Pages/ and invoke with a script runner of your choice.
Notes
Unfortunately, there doesn’t seem to be a scriptable way to determine whether the “Constrain proportions” options is set for a particular graphic. Since this option affects size changes, I simply make the assumption that it is set. It is, by default, for inserted images. For other graphics, check the “Metrics” inspector pane:
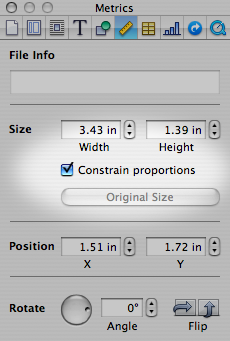
Note that images are not necessarily inserted at their original size. If you want to resize an image to some percentage of its actual size, be sure to click the “Original Size” button before resizing.
This script was written with Pages’ page layout mode in mind, but it should work with graphics in word processing mode, too. There are some rough edges, particularly where handling different sorts of selections is concerned.
Here is a video demonstration.
Posted on Monday, September 24th, 2007. Tags: applescript, mac, pages.
Script Runners
Rather than repeatedly explaining how to launch each script I write, I’m going to use this post as a generic reference.
AppleScripts are typically little bits of code that extend or connect your applications’ functionality. As such, they are not necessarily invoked like normal programs. Many fine utilities exist which provide convenient ways to run scripts, including LaunchBar, Butler, QuickSilver, Keyboard Maestro, and others. Here, however, I will describe the simple script runners I prefer, one of which is even built in to Mac OS X.
FastScripts
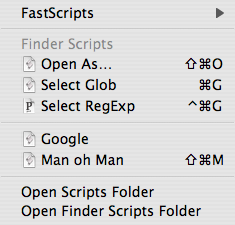
I favor FastScripts, which utilizes the same script folders as Apple’s Script Menu. It features assignable keyboard shortcuts, which help scripts act more like natural extensions of your applications. The FastScripts menu looks like this:
Apple Script Menu
To enable the Script Menu, open “AppleScript Utility” (in /Applications/AppleScript/) and check the “Show Script Menu in menu bar” option:
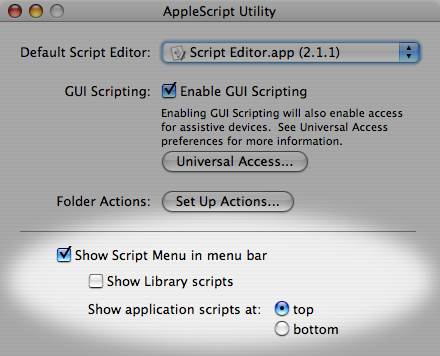
A “script” icon will appear in your menu bar. It displays a menu like this:
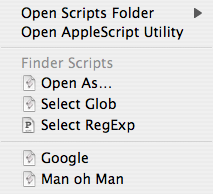
Scripts stored in ~/Library/Scripts/Applications/Finder/ are listed in the “Finder Scripts” section, which appears only when the Finder is the frontmost application. Scripts stored in ~/Library/Scripts/ are listed in the unlabeled section and are always accessible. You can create application subfolders for application-specific scripts yourself. The tilde (~) represents your home folder.
Here is a video demonstration of the Script Menu.
Posted on Monday, September 24th, 2007. Tags: applescript, fastscripts, mac.
Yojimbo Script Updates
Minor updates to a few Yojimbo AppleScripts are available: Export with Comment Tags, Archive Bookmarks, and Backdate Items. These updates allow the scripts to act on items even when Yojimbo’s item list pane does not have input focus. This means you can run the scripts when editing items as well as when selecting them.
Posted on Friday, August 31st, 2007. Tags: applescript, mac, yojimbo.