Tag Archive: “tcl”
Yojimbo to Password Safe
I’ve written a script called yj2pwsafe which adds passwords exported from Yojimbo to Password Safe format database files. Password Safe is an open source password manager developed in part by Bruce Schneier. Many programs are compatible with Password Safe files. My script relies on code from Password Gorilla, a compatible application written in Tcl/Tk.
Downloads, details, and instructions on Github.

I’ve updated yj2pwsafe to be more user-friendly since I first posted this announcement; it is now packaged as an Applescript app that presents a series of dialogs like the one pictured above.
Additionally, I’ve updated yj2pwsafe so that it can import serial number items exported from Yojimbo as well as password items.
Posted on Tuesday, August 20th, 2013. Tags: applescript, tcl, yojimbo.
An arcencode example
Arcencode is my Tcl implementation of the compression algorithm used by both MapQuest and the Google Maps API to encode a list of coordinates as a printable string. It can be used, for example, to obtain a relatively compact representation of a route that can be passed as a single parameter value to a web map.
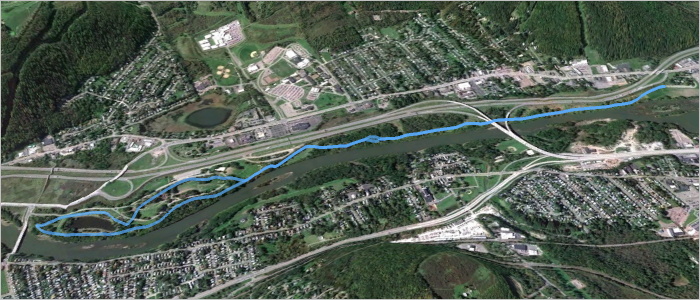
Here is a GPX file exported from a map created with MapMyRun. It contains a track representing a route through a nearby park, pictured above. The track consists of 790 points, listed here in plain text form. If the contents of that plain text coordinate list are assigned to a variable named coordinates, the encoded form can be obtained with:
set encoded [arcencode $coordinates]
With line breaks added, the contents of encoded are:
q}g`GrlfnMPDND\DJ?L?T?P?N?N?N?P?VAPANANAPANAPANATGNELGXENANANCNANA^BNDPDNBNDNDND
NDPDNDNBNDNDPDNDNDNDVHNFPFNFNFNFPFNFNFNFPFNFNFNFPFNDNFNFPFNFNFNFVFNBPBNBNBNBVFND
PDNDPDNFPDNDPDNDPDNDPDNDPDNDPDNFPDNDPDNFPFNDPFNFPFNDPFNFPFNDZLHFJDNFPHNFNHPFNH\F
LAJ?V?F?PFNFNDNFNHZNLHNHLHLHLHNJLHLHT?N?PAN?PAPAVDPFNDNDPDNFNDPDNDNFPDNDPDNFNDPD
ND\JLDNBNDLDNDNBTFNDLBLDVDN@PBN@PBN@PBNBP@XHNHLFNHNFNFLHNFNFPVBNPVJFHHRLHFPANCPC
PAPAR?L@R@P@P?N@P@P@P@P@VFLDLFRHNFNFPFNFNFNFNFNFNFTLHFLPLNJLRTJHPJJDPBTAJCPGPGNE
PGNGPGNGNEPGNGPGNEPGNGNGPGNEPGZIJAJAVJLDLDRAPENCPCNCPENCPCNEPCXGNCLCNCNCPDPHTTJJ
HLHJLNJLLLRLLBPFRNJLJJJLJLTHL@T@L?N@THLHLHLHNLNJLLLJNJ\LL@N@N@L?N@ZALENCLCNENCRI
NGNELGZKNGNGNGNGNGNGNENGNGNGNGNGNGNGTUFQHOHOFQN[HOFMPYHKHINQJKLLHRHPHPHRJPHPHRHP
J^BPDRDPDVJVHNHPPNNJLHLHLJRFPFNDNDPFNDNDPFXHLFLDLDRFNFNDNDRBNBN@RENCPEPCNEXCH@P@
VJJHHHFBEWCSEUGSIUO[KOIMIMUWKMMKMMKMMMMKKMMMMMSMOGMIOIOGOIYQMIMIMGMIKIUMMKOIOKMI
OIOKMIOIOKOISKOEMGOEUCOCQAOAQCQAYCMAMCSEOEOEQCOEWCM@WBMBOBODOBUJMFMHMHMLOJMLWPMF
MFMFWFMBOBODYBO@O?O@O@O@SCOAOCQEOEQEQEOGQEOGWGMAU?M@O@QDODQBWFQBOBO@QBOBOBQBOBSB
O@QB[DOBOBODOBOBOBOBUDQDOBOBQDOBOBW?KEQGMGQ@QBQFOD_@NODOFODOFOFODOFODOFODOFOFODO
FODYJK@Q?SGKCOMKKQQKMKOKMOKUMOGOGOGOGOGOGOGQGOGWKIEOGWEQ?OAQAOAQ?OAQAOAQ?W?SGIIK
GKOKQMOOMMISCUHGFQGOGOIOGOIOGOIQIOGUGQAOCQAOCQAOCQAOC[GOEOEQEOCOEOEOEOEOEOESEOGQ
EOEQGOEQEOEQGUGOEQGOEOEOEQGOEU?Q?O@Q?O@O@YIOIMKMIOIMIOIMIMKQGQGOGOGOGYEM?M?Q@[GM
GOGMGMGMGUIMGOGWMKEMCQIQEOGOGQEOGOGOGQE[KQEOEOEQEOEOEQEOEOEQEOEOEQEOEOEQEOGOEQEO
EWEOCQCOEOCOC_@KOGOGOGOEOGOGQGOGOGOGOGOGOGOEOGOGOGOGOGOGOGWGOEQEOEQEOEQEOEQEOEQE
OEQEOEQEOE[AK@M@Q@Q@OBQ@QFOFOFWBO@Q@O@Q@O@Q@Q@U?O?Q?Q?O?Q?Q?O?]CKEMCME
Succinct, considering it encodes detailed geometry. A coordinate list of 790 corresponding points can be recovered from this block of text with the complementary arcdecode procedure:
set decoded [arcdecode $encoded]
The decoded coordinate list can be examined here.
An important proviso: this encoding scheme is lossy. Specifically, coordinate values are rounded to five decimal places. Compare the input coordinates to the decoded output for an example. Any precision can optionally be specified, but greater precision compromises the amount of compression. (Note that the Google Maps API is only compatible with five-digit precision).
How does this algorithm work? Google offers a technical step-by-step explanation. Essentially, compression is achieved by storing only the difference between each coordinate value and the previous value in the sequence; this requires fewer digits than storing each value in full, especially since precision is limited to a fixed number of digits. The values are packed into a printable Base64 representation in a way that eliminates the need for delimiters between coordinate values: values are bit-shifted left before output, and the ones place is used to mark whether the subsequent character represents a new coordinate or a continuation of the same value.
I updated my WheresThatSat site to use JavaScript and (on the Twitter bot side) Ruby implementations of this algorithm. It’s an appropriate application – previously, satellite ground tracks were encoded as a repetitive sequence of separate point parameters. In addition to yielding somewhat shorter URLs, this compression method ensures the correct point sequence is preserved even if the URL parameters are re-ordered.
Posted on Sunday, March 3rd, 2013. Tags: code, geography, tcl.
Tcl Doctools for BBEdit

Doctools is a Tcl-based markup language suitable for writing software documentation. BBEdit is a Macintosh text editor. I made a Doctools language module (for syntax highlighting) and preview filter and posted them on Github as Tcl Doctools for BBEdit.
Posted on Thursday, December 13th, 2012. Tags: bbedit, mac, tcl.
Screenshots of Selected TKLib Examples
Tcllib (the Tcl Standard Library) includes a number of user interface components, known collectively as TKLib. The documentation is good, but includes no illustrations or screenshots. Here are images of how a few of the visually interesting examples appear on Mac OS X 10.6.4 with Tcl/Tk 8.5.7.
Ctext
Ctext is an enhanced text widget with support for syntax highlighting and other features. Here’s the example (it displays its own main procedure code):

Plotchart
Plotchart is a package for creating charts and graphs. Here’s the xy plot from the description:

Here is the bar chart from the resizing example:

Swaplist
Swaplist provides a canned dialog for exchanging items between two lists. Here’s the example:

Posted on Wednesday, June 30th, 2010. Tags: code, tcl.
Kitgen Build System for Tcl/Tk
In the past I have written a variety of posts about Starkits and Starpacks. Briefly, Starkits provide a way to package complex Tcl/Tk programs in a single file, and Starpacks allow those packages to be combined with self-contained interpreters to deliver stand-alone applications. However, the Tclkit interpreters I originally used for this purpose have not generally been maintained, at least for Mac OS X (Pat Thoyts has done a good job providing current Windows and Linux versions).
Of course, there are various ways to build your own Tclkit equivalent, but I usually found the process slightly too tedious to sustain my interest (although I did succeed with Pat’s version of kitgen shortly before discovering the method described below).
As it turns out, self-contained Tcl/Tk installations functionally equivalent to Tclkits can quite easily be created with the kitgen build system. This comprises a single Tcl script (kbs.tcl) that automates the process of downloading, compiling, and assembling the elements of a “kbskit”. The script is robust – it worked successfully on the first try, without any knowledge of what options to use beyond those given in the Quick Start examples.
If you simply run a fresh copy of kbs.tcl, it will retrieve the Tcl/Tk sources.
Build a Metakit-based kbskit (like Tclkit) with:
./kbs.tcl -r -mk install kbskit8.5
Build a Vlerq-based kbskit (like Tclkit Lite) with:
./kbs.tcl -r -vq install kbskit8.5
In either case, three executables will actually be built:
- A Tcl-only executable, denoted by
-clisuffix - An executable that loads Tk from an external library if needed, denoted by
-dynsuffix - An all-in-one Tcl/Tk executable, denoted by
-gui
On Mac OS X, these executables are found in the buildDarwin subdirectory relative to kbs.tcl. The subdirectory name will presumably differ on other operating systems.
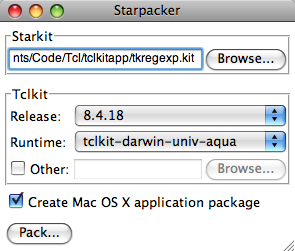
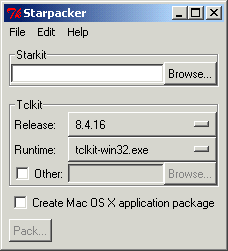
Happily, the kbskits created with the kitgen build system can be used with Starpacker. Check the “Other” box and select the kbskit you prefer to use as the executable in your Starpack:

You can bundle other packages into your kbskits using the -mk-bi or -vq-bi options (-bi stands for “Batteries Included”). This will ensure that those packages (typically useful extensions) are always available to code being run by that kit. Of course, a different approach, with different advantages and disadvantages, is to bundle packages in your application Starkit, which can be executed with different kits.
Additional topics to explore include building the --enable-aqua option and the best method to update both kbs.tcl and the source code it retrieves.
Posted on Sunday, January 10th, 2010. Tags: code, mac, tcl.
LDTrim
LDTrim is a simple program that condenses or formats LDraw code by trimming extraneous characters like spaces – or inserting them to align values in columns.
LDTrim was developed to help “pretty-print” examples for documentation or discussion, but it could also be used to reduce file size or to standardize the format of many models.
Much of what LDTrim does is already possible with LDraw Design Pad. For example, see “Trim Lines” and “Auto Round Selection” under the “Tools” menu.
Usage
Here is the output of ldtrim -help:
LDTrim 1.1
Usage: ldtrim                         Default:
    [-in FILE]  | [-in FILE FILE...]    stdin (use -ing to glob wildcards)
    [-out FILE] | [-out DIRECTORY]      stdout
    [-precision DIGITS]                 all significant digits preserved
    [-trim zeros|none]                  zeros (trims redundant trailing zeros)
    [-justify left|right|none]          none (alignment of values in field)
    [-invalid omit|keep]                omit (keep retains unrecognized lines)
    [-width CHARACTERS|max]             variable (minimum width of all fields)
    [-1..15 CHARACTERS]                 variable (override width for one field)
    [-h|--h|-help|--help]               display this usage summary

If multiple input files are specified without -out, they are modified in place.
If -out is given with multiple input files, output is saved to that directory.

The -precision option causes values to be rounded down and may append zeros to
reach the specified precision unless -trim zeros is explicitly specified.

Whitespace between fields is condensed to a single space.

The -width option pads values with spaces to reach the specified field width.
If -width max is given, the widest value is used as the width for all fields.
(Sub-part names are ignored for this comparison.) If a field value exists that
is wider than the requested width, that width is used as the field width.

Right justification is used if -width or -1..15 is specified without -justify.
If none of -width, -1..15, or -justify is specified, fields are unaligned.

If environment variable GATEWAY_INTERFACE is defined, LDTrim is a CGI script.
Example
Suppose you have saved this LDraw code as sample.ldr:
1 0 20.000000 0.000000 20.000000 0.000000 -1.000000 0.000000 1.000000 0.000000 0.000000 0.000000 0.000000 1.000000 4085c.dat 1 1 28.000000 7.000000 27.000000 0.000000 -1.000000 0.000000 0.500000 0.000000 -0.866025 0.866025 0.000000 0.500000 3023.dat 1 25 36.000000 -5.000000 11.000000 0.000000 -1.000000 0.000000 0.707106 0.000000 -0.707106 0.707106 0.000000 0.707106 2412b.dat Running ldtrim -in sample.ldr -out trimmed.ldr will save the following as trimmed.ldr:
1 0 20 0 20 0 -1 0 1 0 0 0 0 1 4085c.dat 1 1 28 7 27 0 -1 0 0.5 0 -0.866025 0.866025 0 0.5 3023.dat 1 25 36 -5 11 0 -1 0 0.707106 0 -0.707106 0.707106 0 0.707106 2412b.dat The default behavior is to condense the code as much as possible without modifying the model. Alternatively, you can use LDTrim to reformat code. For instance, ldtrim -precision 2 -width 5 -1 1 -2 3 -in trimmed.ldr -out aligned.ldr outputs the following as aligned.ldr:
1 0 20.00 0.00 20.00 0.00 -1.00 0.00 1.00 0.00 0.00 0.00 0.00 1.00 4085c.dat 1 1 28.00 7.00 27.00 0.00 -1.00 0.00 0.50 0.00 -0.87 0.87 0.00 0.50 3023.dat 1 25 36.00 -5.00 11.00 0.00 -1.00 0.00 0.71 0.00 -0.71 0.71 0.00 0.71 2412b.dat Giving a minimum field -width argument implies -justify right. Similarly, decimal -precision implies -trim none, leaving trailing zeros intact. The -1 and -2 options override the minimum width for the first two columns.
Batch Mode
If LDTrim is given multiple input files, it will process them all, saving the results to files of the same name in the directory given by -out or overwriting the input files if no output folder is given.
ldtrim -in $LDRAWDIR/parts/*.dat -out /trimmed/parts/ Note that with a single -in file, -out is interpreted as a single output file, but with multiple -in files, -out is interpreted as a directory to contain the results.
Web Interface
LDTrim has a rudimentary web interface built in. If the GATEWAY_INTERFACE environment variable is detected, LDTrim will behave like a CGI script. Specifically, it will print an HTML form with controls that roughly correspond to its command-line options. LDraw code posted via this form (to itself, as the action ldtrim) is processed according to the selected options. The results are returned in the same form.
Download
LDTrim is also available as a platform-independent Starkit (50 KB) which requires an 8.5 Tclkit.
- Mac OS X 2.4 MB
- Linux (x86) 1.5 MB
- Windows 686 KB
The current version of LDTrim is 1.1; it fixes a bug that caused malformed line endings to be output on Windows.
Posted on Saturday, May 10th, 2008. Tags: LDraw, LEGO, tcl.
List splicing with foreach
Tcl’s foreach command is commonly used to iterate through items in a list. However, I had not realized that it can step through more than one list at once. Here’s a handy application of this property based on an example from the documentation:
proc splice {l1 l2} {
    set s {}
    foreach i $l1 j $l2 {
        lappend s $i $j
    }
    return $s
}
This procedure combines two lists into a new list comprised of alternating items from each input:
% splice {a b c} {1 2 3}
a 1 b 2 c 3
One use for this is to join a list of keys to a list of values to establish a dictionary or an array:
% set dimensions [splice {length width height} {10 16 33}]
length 10 width 16 height 33

% dict get $dimensions height
33

% array set d $dimensions
% set d(width)
16
So if you’ve got an ordered list of values you’d like to access as named fields, you can combine it with a list of field names using foreach and be on your way.
Posted on Monday, April 28th, 2008. Tags: code, tcl.
Starpacker
Starpacker is a utility that helps join Starkits and Tclkits to create stand-alone Starpacks. This can already be done with SDX, which is a superior tool in many ways, but Starpacker provides a simpler interface to this particular aspect of SDX.
More extensive help is included with the program.
Demonstration
Drag an application Starkit onto Starpacker, select a Tclkit, and click Pack to create a stand-alone executable for the indicated platform. The Tclkit is downloaded automatically if needed. (May not work with all Starkits.)
I recommend watching the video full screen for maximum clarity.
Download
- Starpacker for Mac OS X 4.68 MB Universal (based on tclkit-darwin-univ-aqua 8.4.18)
- Starpacker for Windows 1.3 MB (based on tclkit-win32 8.4.16)
- Generic Starpacker Starkit 274 KB (for experimental use with any Tclkit)
Posted on Wednesday, March 26th, 2008. Tags: code, mac, tcl.
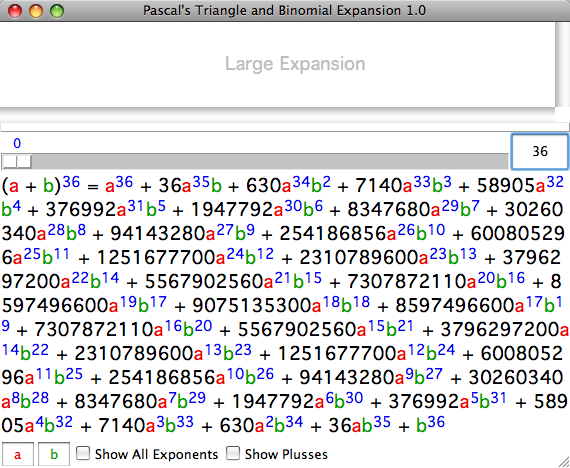
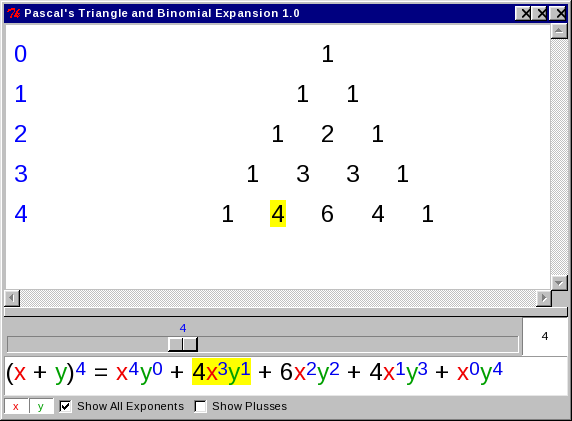
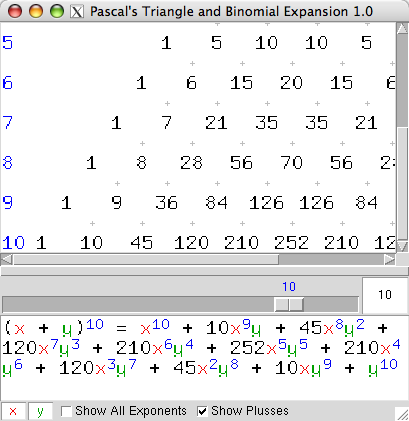
Pascal’s Triangle
Recently I was introduced (or perhaps reintroduced) to Pascal’s Triangle, an arrangement of integers that lends itself to a variety of purposes, including binomial expansion. I’ve written a little program to explore this aspect of the idea.
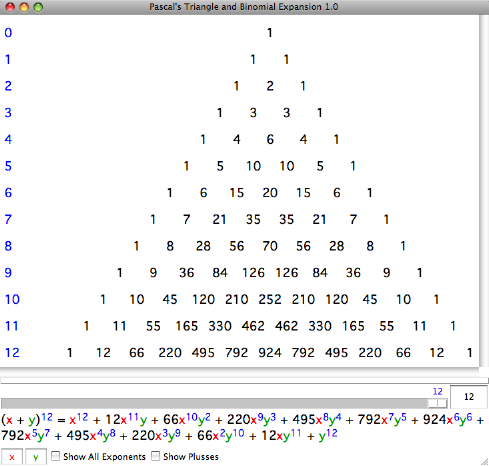
Features
- Interactively adjust the degree of the expansion to see the corresponding triangle.
- Change the binomial terms for clarity or convenience.
- Show exponents of the first and zeroth power to illustrate that the total degree of each term matches the degree of the initial expression.
- Show plus symbols in the triangle to emphasize how each row is the basis for the next.
- Mouse-over highlight of corresponding terms in triangle and expansion.
- Binomial expansions to any degree can be computed (although the triangle is only displayed for small values due to limitations of the current layout spacing).
- Click and drag in triangle to scroll or drag divider to adjust size of expansion pane.
Screenshots
Download
- Mac OS X: pt.app.zip 2.5M
- Windows: pt.exe.zip 1.3M
- Other: pt.tcl.zip 2.3K or pt.kit.zip 2.8K; requires Tcl/Tk 8.5 or a corresponding Tclkit, respectively. The Mac OS X and Windows versions are self-contained (and hundreds of times larger, unfortunately).
Posted on Monday, February 25th, 2008. Tags: mac, math, tcl.
Msgcat and Mac OS X
The Tcl core library includes msgcat, a package which facilities program localization. msgcat provides means to define a catalog of messages in multiple languages and a procedure to retrieve messages appropriate to a specific locale, typically determined by cues from the operating system.
In general, to localize puts "Hello, world!", you provide equivalent strings for each supported locale and select the appropriate one at runtime by stating puts [mc "Hello, world!"]. For example, this command might print ¡Hola, mundo! if the locale is es. Default strings in the programmer’s native language can usually be used as keys to the message catalog.
Anyway, msgcat looks at a couple environment variables (or the Windows registry) to determine the proper locale. On Mac OS X, this works fine for scripts launched from the command line, but spiffy desktop applications don’t necessarily have access to the same environment variables. If no supported environment variables are available, msgcat uses the locale implied by the “Region” setting of the “Formats” pane of Mac OS X’s “International” system preferences. You can query this string from the command line with:
defaults read 'Apple Global Domain' AppleLocale
It is also available from within Tcl as the variable ::tcl::mac::locale.
To test localized Tcl desktop applications on Mac OS X without changing your system region, you can define the locale in ~/.MacOSX/environment.plist. Environment variables specified in this file are available to programs launched from the Finder, so msgcat will see these settings before resorting to the system locale. For instance, to set the locale to es, add this property to environment.plist:
<key>LANG</key>
<string>es</string>
See QA1067 for more information about environment.plist, including how to create it if it does not already exist. Note that variables defined in this file will be visible to all programs, and may therefore affect other applications.
Here’s how I usually comment the code I use to initialize msgcat:
# localization courtesy of Message Cat:
#
#  |\        /|
#  | \______/ |
#  /  _    _  \
#  | <l>  <l> |
#  \    __    /
# ----- \/ -----
#  --\__/\__/--
#
Posted on Tuesday, January 29th, 2008. Tags: code, tcl.