ArtRage System Color Picker
Here is a script that helps you use a conventional color picker with ArtRage. Install it in ~/Library/Scripts/Applications/ArtRage 2. When you run the script, the system color picker will appear. Once you choose a color, it is automatically entered in ArtRage’s color picker.
Download System Color Picker for ArtRage 2 3.6 KB
This script requires access as an assistive device.
Posted on Wednesday, March 12th, 2008. Tags: art.
Bookmark in Yojimbo for Camino
I’ve posted a Camino-compatible version of my venerable Bookmark in Yojimbo script.
Update: Revised for Camino 1.6. New in Camino 1.6 is the ability to add any script in ~/Library/Scripts/Applications/Camino to the toolbar, so you don’t even need to use a separate script runner.
Posted on Tuesday, March 4th, 2008. Tags: applescript, camino, mac, yojimbo.
Remote Applications
BCC provides remote access to “licensed campus software”. This allows students to log in from off campus to use desktop software hosted on campus. I’m not too familiar with the protocol, but it seems like a Windows-oriented combination of VNC and X. Happily, clients are available for many platforms.
All I had to do to get started was download the Mac OS X Citrix ICA Client. Choosing a program from the access page downloads a “bookmark” that the client uses to launch the remote application.
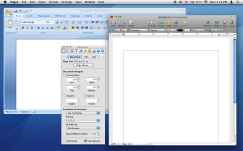
Here’s Microsoft Word 2007 running in the background with a local application in the foreground. Sharp eyes may notice minor compression artifacts in the Word window. Connecting from across town, performance is sufficient to get work done.
Of course, the real benefit of this system is access to specialized professional applications, not word processors. Not all software available on campus is remotely accessible, but some of it is.
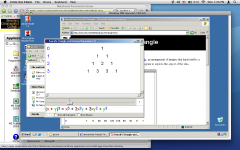
You can also access a virtual Windows desktop. Handy for confirming the cross-platform compatibility of mathematical curios without the need to maintain a separate PC.
Remote applications of this sort are surely unsuited for many purposes. However, I think it is a viable approach for occasional use, particularly in cases where an institution provides software that isn’t otherwise practical for its members to obtain. Good for wrapping up projects without hasty trips to the computer lab, I imagine.
Posted on Monday, March 3rd, 2008. Tags: mac.
State Abbreviations Service
Here’s a little service for Mac OS X that replaces the selected US state name with its postal abbreviation, or vice versa. If NY is selected, it will be replaced with New York. If New York is selected, it will be replaced with NY. Case doesn’t matter.
Download State Abbreviations Service 63K
Posted on Friday, February 29th, 2008. Tags: mac.
A More Perfect Union
You’ve heard about the military-industrial complex. Have you heard about the prison-industrial complex? One in a hundred Americans are in jail. You know a hundred people. If none are in jail, consider those who stand on the other side of average. Johnny, we miss you.
Speaking of prisons, you’ve probably heard about Abu Ghraib. I want you to look at some pictures taken there. Expect blood, shit, unhappy genitalia, and healthy young women smiling over dead bodies—you know, reassuring evidence of the harsh but justifiable means that keep our world safe from cruelty and pain.
I want you to look at those pictures because I want you (friends, family, acquaintances) to think about how things like that came to happen. I don’t claim to know, myself, nor am I particularly interested in ascribing blame, but the fact that such events took place, in any context, really bothers me.
(We now return you to our regularly scheduled program of AppleScripts, LDraw, and, apparently, math!)
Posted on Friday, February 29th, 2008. Tags: society.
Radians
I never used to understand radians. Sure, I knew how to use them in typical math problems, but splitting a circle into 2π units? Who divides a circle into six point something parts? You’ve got a useless little slice left over.
Well, remember the formula to find the circumference, C, of a circle? It’s C = πd, where d is the diameter of the circle. The diameter is simply twice the radius r, so you can also define the circumference as C = 2πr.
Consider a circle whose radius is one (the unit circle). Its circumference is simply 2π:
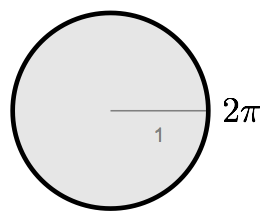
The circumference of a circle is the the distance around its edge. If you don’t go all the way around the unit circle, the length of the arc you do traverse should be less than 2π, right? It might be ¼π, ½π or plain old π if you only go an eighth, a quarter, or a half way around the circle.
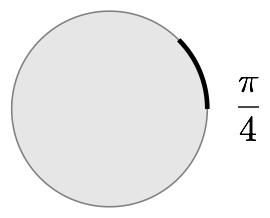
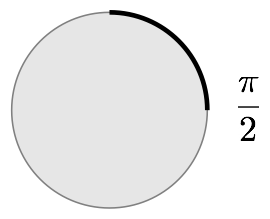

Look at the wedges created by arcs with these lengths: they describe 45, 90 and 180 degree angles. The radian equivalents of these angles are ¼π, ½π, and π.
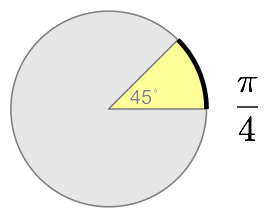
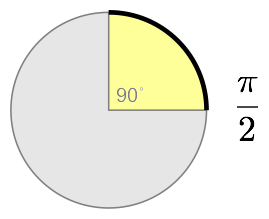
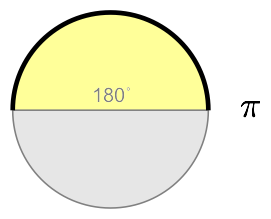
That’s it. A radian angle measurement is the length of the biggest arc that will fit in unit pacman’s mouth!
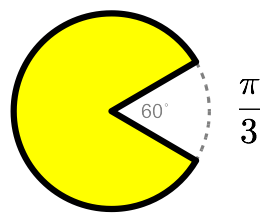
Their close connection with the basic geometry of circles makes radians convenient for a variety of purposes. But don’t worry, degrees are cool, too: 360, that’s what, almost as many days as there are in a year? Close enough for pagan ceremonies and government work!
Posted on Thursday, February 28th, 2008. Tags: math.
Pascal’s Triangle
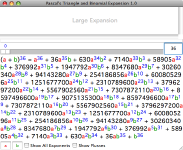
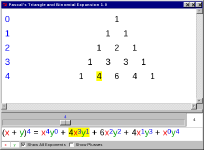
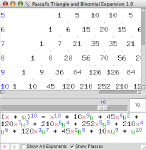
Recently I was introduced (or perhaps reintroduced) to Pascal’s Triangle, an arrangement of integers that lends itself to a variety of purposes, including binomial expansion. I’ve written a little program to explore this aspect of the idea.
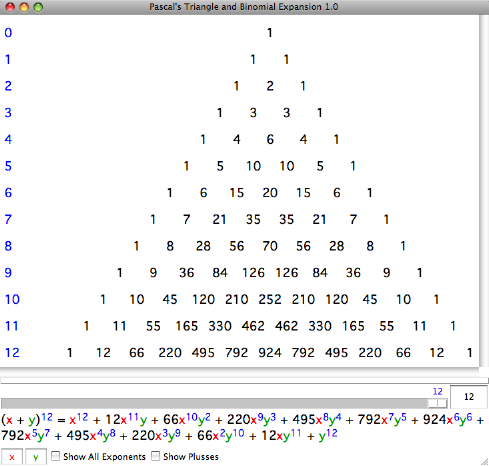
Features
- Interactively adjust the degree of the expansion to see the corresponding triangle.
- Change the binomial terms for clarity or convenience.
- Show exponents of the first and zeroth power to illustrate that the total degree of each term matches the degree of the initial expression.
- Show plus symbols in the triangle to emphasize how each row is the basis for the next.
- Mouse-over highlight of corresponding terms in triangle and expansion.
- Binomial expansions to any degree can be computed (although the triangle is only displayed for small values due to limitations of the current layout spacing).
- Click and drag in triangle to scroll or drag divider to adjust size of expansion pane.
Screenshots
Download
- Mac OS X: pt.app.zip 2.5M
- Windows: pt.exe.zip 1.3M
- Other: pt.tcl.zip 2.3K or pt.kit.zip 2.8K; requires Tcl/Tk 8.5 or a corresponding Tclkit, respectively. The Mac OS X and Windows versions are self-contained (and hundreds of times larger, unfortunately).
Posted on Monday, February 25th, 2008. Tags: mac, math, tcl.
The Trammel Method
A trammel is an impediment to freedom or motion. By placing some geometric restrictions on the motion of a pen or pencil, specific types of figures can be drawn. The trammel method is one of many ways to apply this principle to the construction of ellipses (circles and ovals). It’s particularly handy if you need to draw a large curve without a compass.
Draw a pair of perpendicular lines where you’d like to place an ellipse. I’ve labeled them as major (long) and minor (short) axes.
On a piece of scrap paper, mark the length of a minor radius. (Place the corner of the scrap paper at one end of the minor axis and mark where the axes cross.)
Then mark the length of half the major axis from the same corner.
Now slide the minor mark along the major axis and the major mark along the minor axis. (The marks on the scrap paper ride the opposite rails.) Make a dot at the corner of the scrap paper at any position that satisfies these conditions.
Since the marks on the scrap paper can’t leave their rails, you’ll draw a dot right at the tip of an axis whenever the corresponding mark passes through the intersection of axes.
Mark dots in each quadrant of the ellipse.
See where this is leading? The major mark is still sliding along the minor axis and the minor mark is still sliding along the major axis.
Eventually, you’ll have a series of dots describing the perimeter of the ellipse you planned. The more dots you plot, the smoother the outline.
All that’s left to do is connect the dots.
A circle is a special sort of ellipse in which the major and minor axes are simply the same length. In this example, I’ve just drawn one diameter since only one mark is really needed. (Both marks would fall at the same point, technically, anchoring the card to the center of the circle.)
This technique is often attributed to Archimedes, mover of worlds. (With a long enough lever, and a place to stand…)
Posted on Saturday, February 2nd, 2008. Tags: art, math.
Hacking Leopard Help
Update: A better way to improve the help viewer’s usability is documented here.
Mac OS X 10.5’s help viewer application is widely considered to be a piece of crap. Unlike the help viewer in previous iterations of Mac OS X, it presents no Dock icon, no proper menu bar, and exhibits an annoying tendency to obscure the application you needed help with in the first place.
So, fix it. Or at least have your vengeance by grossly disfiguring it.
Navigate to /System/Library/CoreServices. Copy Help Viewer.app to the Desktop, right-click the copy, and select Show Package Contents.
Open the Contents folder and open Info.plist. Change the value of the LSUIElement property to 0:
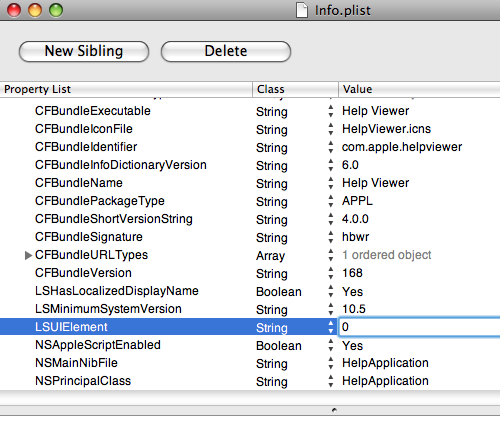
This makes the application’s Dock icon and menu bar visible. There are definitely some quirks (keyboard shortcuts don’t seem to work as expected), but it works.
Next open the Resources folder and the appropriate subfolder for your localization (English.lproj in my case). Open HelpWindow.nib with Interface Builder and select the HelpWindow item:
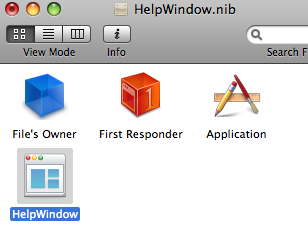
Display the Inspector (from the Tools menu) if it is not already visible and display the Attributes pane. Uncheck Utility and Non Activating under Panel Style:
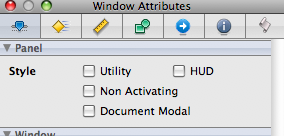
This makes the help window look and behave a bit more like a regular window. Unfortunately, I can’t figure out how to prevent it from floating above other windows (perhaps that behavior is not controlled by the nib file). However, if you check Hide On Deactivate under Window Behavior in the same Inspector pane, the help window will at least sweep itself out of the way when you bring a different application to the front.

Clicking the help viewer’s Dock icon makes the window visible again, but also creates a new help window.
To apply your changes, save and close HelpWindow.nib and drag your copy of Help Viewer.app back to /System/Library/CoreServices. You’ll need to authenticate the copy operation since you really shouldn’t be diddling around in this directory. (You did make a back up, didn’t you? Good. Neither did I.)
You can test your modified copy of Help Viewer before copying it back to CoreServices, of course, but it won’t handle requests from the Help menu until you do.
Now when you seek help, Help Viewer will actually show up in the Dock. You’ll have menus, and you can even open multiple help windows. Unfortunately, the program launches in the background, so you’ll still have to switch applications with Command-Tab or click the Dock icon to view the requested documentation.
Please share any corrections, clarifications, or further contributions to the cause! I’m no Cocoa or Interface Builder expert. Most importantly, minimize the need for constant help consultation by thinking carefully about the use and design of your application. Put reference material in a nice PDF and call it a day.
Posted on Wednesday, January 30th, 2008. Tags: mac.
Msgcat and Mac OS X
The Tcl core library includes msgcat, a package which facilities program localization. msgcat provides means to define a catalog of messages in multiple languages and a procedure to retrieve messages appropriate to a specific locale, typically determined by cues from the operating system.
In general, to localize puts "Hello, world!", you provide equivalent strings for each supported locale and select the appropriate one at runtime by stating puts [mc "Hello, world!"]. For example, this command might print ¡Hola, mundo! if the locale is es. Default strings in the programmer’s native language can usually be used as keys to the message catalog.
Anyway, msgcat looks at a couple environment variables (or the Windows registry) to determine the proper locale. On Mac OS X, this works fine for scripts launched from the command line, but spiffy desktop applications don’t necessarily have access to the same environment variables. If no supported environment variables are available, msgcat uses the locale implied by the “Region” setting of the “Formats” pane of Mac OS X’s “International” system preferences. You can query this string from the command line with:
defaults read 'Apple Global Domain' AppleLocale
It is also available from within Tcl as the variable ::tcl::mac::locale.
To test localized Tcl desktop applications on Mac OS X without changing your system region, you can define the locale in ~/.MacOSX/environment.plist. Environment variables specified in this file are available to programs launched from the Finder, so msgcat will see these settings before resorting to the system locale. For instance, to set the locale to es, add this property to environment.plist:
<key>LANG</key>
<string>es</string>
See QA1067 for more information about environment.plist, including how to create it if it does not already exist. Note that variables defined in this file will be visible to all programs, and may therefore affect other applications.
Here’s how I usually comment the code I use to initialize msgcat:
# localization courtesy of Message Cat:
#
#  |\        /|
#  | \______/ |
#  /  _    _  \
#  | <l>  <l> |
#  \    __    /
# ----- \/ -----
#  --\__/\__/--
#
Posted on Tuesday, January 29th, 2008. Tags: code, tcl.
