Author Archive
Workspaces
Amar Sagoo (author of Namely) finds that a tabletop whiteboard is a useful tool for planning and discussion:
We’ve found ourselves using it virtually every day, illustrating explanations, walking through calculations and brainstorming design ideas. Visitors will intuitively pick up a pen and start using the whiteboard when explaining things. It somehow seems to invite people to use it more than most whiteboards. However, it’s not only a collaborative tool: it also makes a great scratch-pad when you’re brainstorming on your own. To ensure that it stays useful, we make an effort to keep the board clean; nothing tends to stay on there for longer than a day or so.
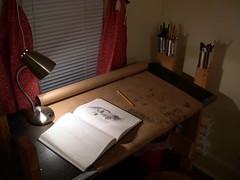
I’ve got a large roll of packing paper which I use for a similar purpose at my desk. It’s great to be able to jot down a note or a doodle without pausing to search for paper or an appropriate notebook. As the sheet fills up, I pull it down to reveal a clean area. I’ve yet to devise an effective spool, but the scroll nevertheless contains an interesting record of spontaneous notes and drawings.
Now that I’m studying mechanical drawing, I’ve developed an interest in drafting equipment and techniques. Perhaps in the future my desk will receive further augmentation. In the meantime, a fine set of parallel rules can be made from surplus LEGO:

Lastly, I’ve fiddled with some of my shelving to make a nice standing work area for my laptop:
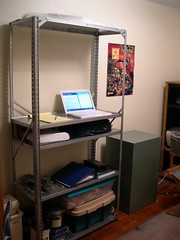
It may not be the best arrangement for long sessions, but I’ve found it surprisingly practical for many tasks. I think that standing up helps me to stay focused. When my mind wanders (as it is wont to do) it is easier to step back and tend to other things than when seated.
The kitchen table is a good place to get things done, too.
Posted on Tuesday, January 29th, 2008.
Yojimbo Tag Companions
I use this little script when I want to ensure that every Yojimbo item with a certain tag also has some other tags. For instance, to ensure that every leoben item is also tagged cylon, I run the script, select leoben from the first list of tags that appears, and cylon from the second list.
Posted on Thursday, January 17th, 2008. Tags: applescript, mac, yojimbo.
An Introduction to News Feeds
Most web sites are updated from time to time. News feeds are supplementary files (in RSS or Atom format) that provide a summary or an alternative source of recent additions to such sites. These feeds are read by programs (or web-based services) known as feed readers, which provide people with an overview of what’s new at their favorite sites.
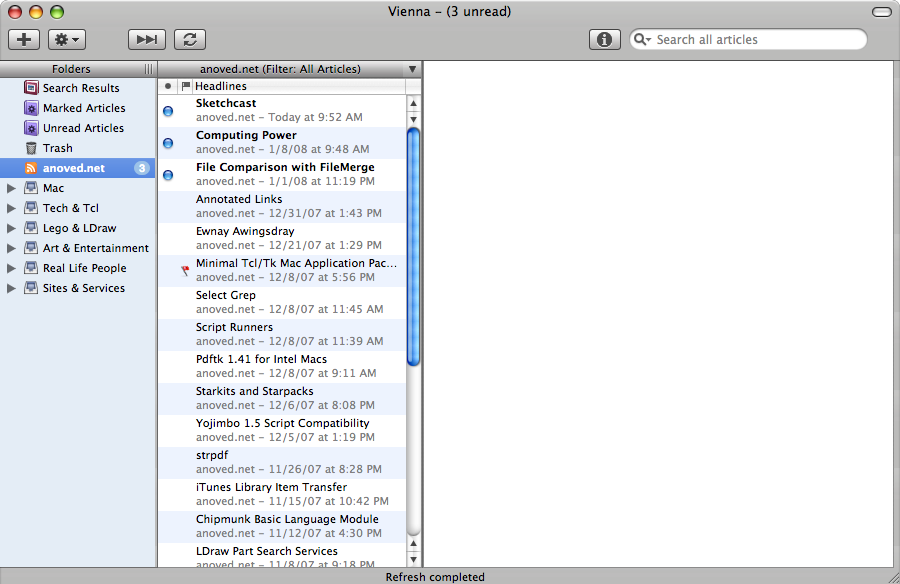
Popular feed readers include NetNewsWire and Google Reader. I use Vienna. Current browsers can display feeds, too.
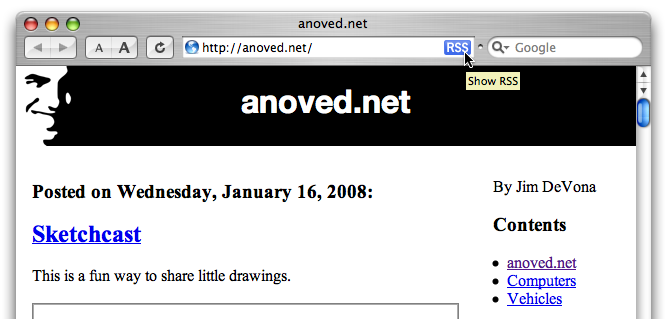
Web sites that offer news feeds are usually identified by an icon in the browser tool bar. Safari displays a blue “RSS” badge when it detects an available feed; Firefox and other browsers show an orange logo. Alternatively, a link or button within the web page, labeled “RSS/Atom,” “XML,” or “feed,” may indicate that a news feed is available. In any case, clicking the icon or link will establish a subscription to that feed.
Your feed reader will periodically check to see if any of your subscriptions have been updated. If so, it will retrieve information about the new content — often including the new content itself — and display each new item in a list resembling an email inbox.
You can read new posts right in the news reader or follow a link to read them in context at the original web site. Since some news feeds provide only the title of new articles, you must visit the associated page to read the actual content in these cases.

Different feed readers provide different ways to manage your subscriptions. There are some common features, however. You can group related subscriptions, and you can save or discard items you’ve read — otherwise, they may eventually expire.
Feed readers are sometimes called news aggregators because they collect information from many sources in one convenient location. I find this service useful because it helps prevent me from wasting time online: instead of surfing from site to site and back again, I simply subscribe to sites I find interesting. It’s like receiving a newspaper instead of spending all day gathering news myself. It also helps me to keep an eye on sites I might otherwise forget to check.
Posted on Wednesday, January 16th, 2008. Tags: mac.
Computing Power
The current Mac Pro is available with eight 3.2 GHz 64-bit cores, 32 GB of RAM, terabytes of storage, and support for up to eight 30-inch displays (eight 30-inch displays!), all in a practical form factor that runs certified UNIX.
Sure puts some of the rack-mount monstrosities I’ve met in perspective.
Anyway, perhaps you’d rather meet my calculators.
Posted on Tuesday, January 8th, 2008. Tags: mac.
File Comparison with FileMerge
Wherein I explain the anatomy of a FileMerge window
FileMerge is a visual diff utility included with the developer tools that ship with Mac OS X. As its name suggests, it is intended to help compare and resolve differences between files. It is particularly useful for quickly and clearly reviewing changes between different revisions of a single file under version control.
You can choose which files to compare with a dialog
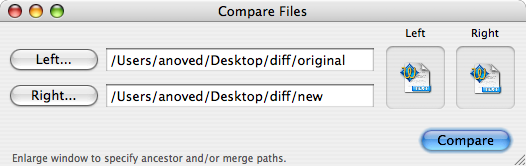
or via the opendiff command:
opendiff original new
For this example, I will compare the contrived sample files used in Wikipedia’s diff article. In either use case, the files are displayed side-by-side with differences highlighted:
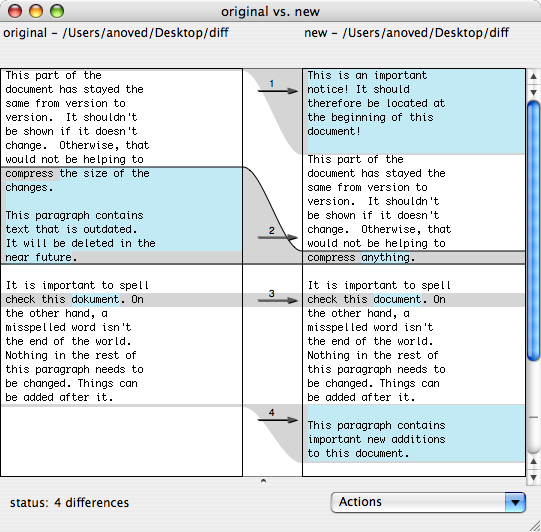
Blue highlights indicate changes. The regions where these changes occurred in each file are connected by gray highlights.
Scrolling is synchronized to show most unchanged areas together; as you scroll, each pane moves at variable speed to maintain this visual correspondence between reference points. It’s nice.
The relative location of each change in the file is indicated by a tick mark in the scroll bar. For long files, these marks act like a simple histogram to summarize the distribution of changes throughout the file.
A dark border surrounds the currently selected difference (number 2, in this example). The up or down arrows move the selection to the previous or next difference.
The left and right arrows keys can be used to select which version of the current region of change should take precedence if you save a merged version of the files. In this example, and by default, the arrows in the center column indicate that the file on the right always takes precedence.
The separator near the bottom of the window can be dragged up to reveal a preview of the merged file. The Actions menu offers additional ways to merge the selected change.
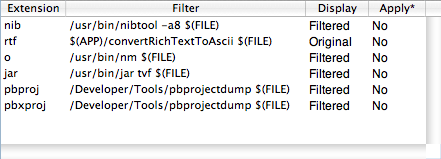
FileMerge can preprocess a file if a command line filter is assigned to the file’s extension. This can be used to compare dynamically-generated text representations of binary files.
Update: The new application Changes performs a similar function with the advantage of Unicode support. Might be especially useful for revising localized files like message catalogs.
Posted on Tuesday, January 1st, 2008. Tags: mac.
Ewnay Awingsdray
Here are a few recently scanned drawings:


Also, don’t miss my contributions to the inexplicable Bears in Ill-fitting Hats group:


Posted on Friday, December 21st, 2007. Tags: art.
Minimal Tcl/Tk Mac Application Packages
Here is one way to create a self-contained double-clickable Tcl/Tk application for Mac OS X.
Code
Save this text as hello.tcl:
package require Tk
pack [label .l -text "Hello, World!" -padx 30 -pady 30]
For clarity, save this and other example files to the Desktop.
Tclkit
Download and unzip 8.4.16/tclkit-darwin-univ-aqua from the Tclkit download matrix. This is a universal binary version of the latest stable release of Tcl/Tk with native Mac OS X interface elements.
Update: On Mac OS X 10.5 (“Leopard”), at least with current X11 patches, you can use non-Aqua Tclkits as the basis for Mac application packages. X11 will open automatically. Since Tk Aqua doesn’t play well with Leopard, this may prove to be a useful (if ugly) interim solution.
Updatier: The Leopard compatibility problems alluded to above appear to be resolved in Tcl/Tk 8.4.17. Tclkits of 8.4.17 and the official 8.5.0 release are now available.
Updatiest: You can now build your own tclkits with ease using the Kitgen Build System.
SDX
Download sdx.kit from the SDX web page. SDX is a utility that can, among other things, create executable Starpacks by joining Tclkit interpreters with your Tcl code. (Safari may warn that the file is executable and append .sh to its name; just remove the .sh after downloading.)
Files
Open Terminal and change to the directory containing these files:
cd ~/Desktop
Make an executable copy of the Tclkit.
cp tclkit-darwin-univ-aqua tclkit
chmod +x tclkit
The duplicate is needed because Tclkit is used both to execute SDX and as input to SDX. It cannot otherwise operate on itself.
Starpack
Create the Starpack by “quick wrapping” the sample code:
./tclkit sdx.kit qwrap hello.tcl -runtime tclkit-darwin-univ-aqua
This yields the executable file hello, which you can run from the command line:
./hello
Different Tclkits can be used to create executables for different platforms. Omitting the -runtime argument creates a platform-independent Starkit which can be executed by an external Tclkit. Instead of qwrap, more complex projects can use the wrap command to package their entire directory structure as a virtual filesystem.
Icon
Every application needs a good icon. This is not a good icon, but it will suffice as an example:
Img2icns is a handy utility for converting images to icns files.
Package
Create a folder called Hello World.app. Because the app extension designates an application, the Finder will treat the folder as an application package. Control-click the embryonic application and select “Show Package Contents”:

Create a folder called Contents inside the package, and two folders titled MacOS and Resources within Contents. Drag hello.icns into Resources and the hello executable into MacOS.
Info
Every application contains a file that lists certain application properties. Because some properties identify the very components that comprise the application, the application won’t work without this vital file.
Here is an example Info.plist. Place this file in the package’s Contents folder.
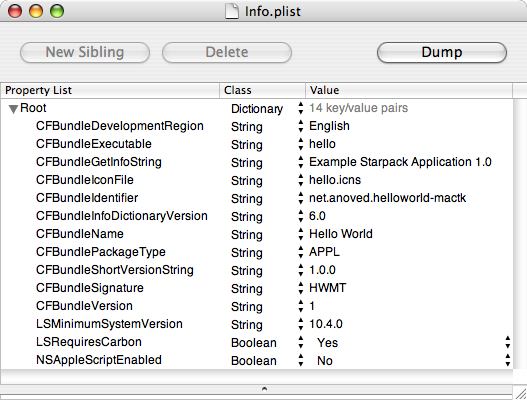
Note that the CFBundleExecutable property identifies the executable (found in MacOS) and that CFBundleIconFile identifies the application icon (found in Resources). The CFBundleIdentifier and CFBundleSignature properties should be unique to your application. The CFBundleGetInfoString, CFBundleShortVersionString, and CFBundleVersion properties specify your application’s version.
Consult Apple’s Property List Key Reference for more details about these and other possible application properties. As XML files, property lists can be edited with text editors or Apple’s dedicated Property List Editor (included with the developer tools).
Showtime
The application package should now be organized like this:
Hello World.app
 /Contents
    Info.plist
   /MacOS
      hello
   /Resources
      hello.icns
It may be necessary to temporarily rename the application in order for the Finder to recognize the new package information. Hello World.app will adopt the hello.icns icon. Give it a double-click:
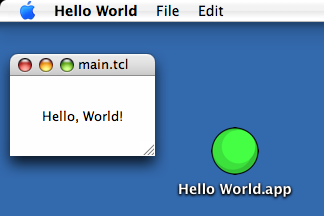
The default menu bar items and window title are provided by Tk. The internal main.tcl filename is introduced by qwrap.
So, that’s a tidy way to package a Tcl/Tk program for Mac OS X deployment. The application package is really just a few folders, an icon, and a property list wrapped around a Starpack. If you’re already using Starkits, you’re only a few steps away from delivering a relatively well-integrated Macintosh version of your application.
Credit
The technique described here is largely inspired by Kevin Walzer’s How to Build Tcl/Tk Application Bundles the Mac Way tutorial. The companion article on Tk Aquafication offers more guidance on integration with Macintosh interface conventions.
The example Info.plist is based on the property list included in the Tcl/Tk Aqua 8.4.16 standalone Wish Shell, which I cannot find listed on any relevant web sites. As with other recent releases, it seems to be available only by direct download from mailing list announcements.
Posted on Saturday, December 8th, 2007. Tags: code, mac, tcl.
Select Grep
Update: Now located at https://github.com/anoved/Finder-Scripts/tree/master/Select%20Grep
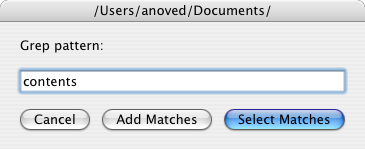
This script for the Finder is derived directly from the venerable lselect. Rather than select files whose names match a certain pattern, Select Grep selects files whose contents match a certain pattern.
Subdirectories are not searched and the pattern is not case sensitive. Extended regular expressions are supported. Compatibility with binary files has not been tested. The specific options given to grep are -liE. The script is easily edited to use different option combinations; please share any improvements.
Put the script in ~/Library/Scripts/Applications/Finder and run it to select files in the frontmost Finder window that contain the search pattern.
Posted on Saturday, December 8th, 2007. Tags: applescript, finder, mac.
Yojimbo 1.5 Script Compatibility
Today Bare Bones Software released Yojimbo 1.5, a significant update to the all-purpose desktop database. Since I’ve written quite a few little scripts for the program, I gave them each a quick test to check whether they worked with Yojimbo 1.5 and Mac OS X 10.4.11. Happily, most of them do.
Compatible
- Bookmark in Yojimbo
- Tag List
- Import Note Service
- Export with Comment Tags
- Archive Bookmarks
- Backdate Items
- Backdate Import
Updated
- Expanded Comment Fields I’ve posted a new set of
nibfiles compatible with Yojimbo 1.5.
I haven’t tried the indispensable widescreen hack yet.
Posted on Wednesday, December 5th, 2007. Tags: mac, yojimbo.
Pdftk 1.41 for Intel Macs
Pdftk is a useful utility for manipulating PDF files. A Macintosh binary of the current version was not available, except perhaps from Fink or Darwin Ports, so I built it myself. My version is not universal, but it doesn’t require a package manager, either.
Until such time as this binary is available directly from the official pdftk site, you can get it here:
Download pdftk 1.41 for Intel Macs 1MB
Note: the default pdftk Makefile settings result in a binary that still relies on gcj. Until such time as this issue is resolved, the binary probably won’t be much use!
Building pdftk requires gcj, which comes with gcc, but apparently not with Mac OS X. So, I downloaded and built GCC 4.2.2. Why 4.2.2? Because it was the most recent version.
./configure --prefix=/usr/local/gcc/4.2.2 --disable-multilib
make
make install
The --prefix option installs everything out of the way in its own little directory; I wasn’t really interested in upgrading to a new version of gcc just to build pdftk. The --disable-multilib option turns off some crap that caused build errors.
Once that’s done, building pdftk is just a matter of pointing the makefile at the new gcc stuff.
cd pdftk
# In Makefile.MacOSX, define TOOLPATH=/usr/local/gcc/4.2.2/bin/
make -f Makefile.MacOSX
make install
So that’s how you roll your own.
Posted on Monday, November 26th, 2007. Tags: mac, pdf, tcl.