Author Archive
LDraw and “Multitouch Augmented Reality”
An upcoming version of the library behind the SSTT Visualizer used in LDraw Augmented Reality will support multitouch input, allowing your fingers to be recognized as input devices. It looks like you can use gestures to operate virtual/visual controls like sliders along the side of the marker image. Here’s a video of examples:
A variant of my Scout model appears near the end of the video. Neat!
Posted on Tuesday, September 1st, 2009. Tags: ar, LDraw, LEGO.
Unofficial build of LDView 4.1 (with 3DS export)
My introductory guide to LDraw Augmented Reality relies on LDView’s 3DS export feature, which is currently present only in unreleased development versions of LDView.
Here is an unofficial Macintosh build of LDView 4.1 (code retrieved from Sourceforge on 31 August 2009). It includes 3DS export. Hopefully this helps a few more people get started with LDraw and SSTT Visualizer.
Download LDView-Unofficial.zip (Intel Mac OS X only) 1MB
Update: A formal beta version of LDView 4.1 has been released.
Posted on Monday, August 31st, 2009. Tags: ar, LDraw, ldview, LEGO, mac.
LDraw Augmented Reality
Step 1
Create an LDraw model using Bricksmith or some other LDraw editor.

I use LDraw to record the design of models I’ve built. Here are the originals:

Step 2
Open the LDraw model in LDView.

(Note: as reported in the comments, 3DS export is not available in LDView 4.0.1, the most recent stable release. For the time being, you’ll need to build LDView yourself to utilize this feature.)
Choose Export from the File menu. Select “3DS: 3D-Studio File” from the File Format popup menu.

Name the file and click Save.
Step 3
Download the SSTT Visualizer Augmented Reality Demo from technotecture.com. Models, fiduciary marker images, and configuration files are stored inside the visualizer application package. Right-click the application and select Show Package Contents:

Drag the model you saved in Step 2 into the Contents/Resources/sstt subfolder:

Step 4
Edit the config.txt file.
fiducial sstt/watch_fiducial.jpg 80 52
translate 0 0 0
model sstt/model.3ds 0.26
Consult the visualizer User Manual for more details about the syntax of this file. Here’s a line-by-line explanation of the example:
fiducial sstt/watch_fiducial.jpg 80 52
This identifies the tracking image from which the model’s position and orientation should be derived – the model will appear above this image (the default) wherever it appears in the scene.
translate 0 0 0
The translate statement can be used to adjust the position of the model relative to the image. Increase the last coordinate to elevate the model above the image surface or to compensate if the origin of your LDraw model is above or below the point where it should contact the ground.
model sstt/model.3ds 0.26
This line identifies the model to display. Adjust the number to change the apparent display size of the model. A scale factor of 0.26 seems to work well with the default tracking image printout.
Step 5
Print out the tracking image sheet (PDF), start the SSTT Visualizer program, and point your computer camera at the sheet. It may take a moment for larger models to load.
As you may notice, it lags a little sometimes, but I’d say it’s still pretty neat. It may prove possible to optimize the 3DS files for smoother performance, as there is a lot of internal part and model geometry that is unnecessary in this context.
Posted on Saturday, August 1st, 2009. Tags: ar, LDraw, LEGO.
Kickstands and Racks
You can use a scrap of rubber from an old bike tire inner tube to improvise a no-slip/no-scuff tip for your kick stand.
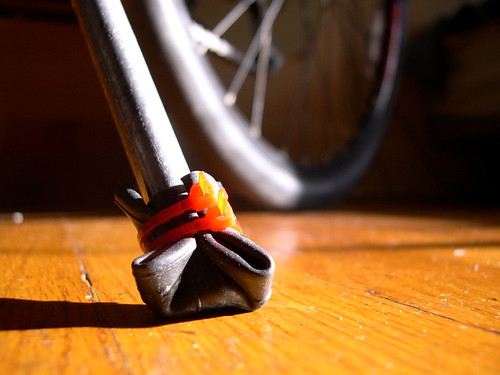
I folded a wad of inner tube over the end of my kickstand and zip-tied it in place. This makes it safe to park on surfaces such as your bedroom’s beautiful hardwood floor.
I was partly inspired by an Instructable article that describes many uses for old inner tubes. Since I recently decommissioned a tube, I’ve got some material to play with.
In other news, I recently completed installation and reinforcement of a set of front racks, thus greatly increasing my expeditionary cargo capacity.
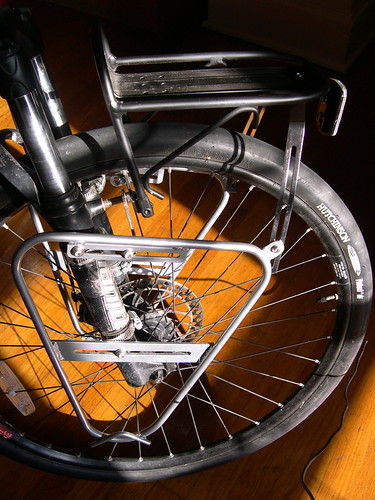
The side racks are Delta Shock Treatment racks – contrary to the description, they do work with disc brakes. The kit comes with two kinds of mounting hardware – I used the hose clamp approach, which affords enough flexibility in positioning to avoid conflict with other components. (Note the Nashbar version of the kit does not include the “optional cross brace”.)
The front rack is Nashbar’s aptly-named Front Rack. It requires additional reinforcement, in part because it pivots at the brake boss mounts. The default support is intended to connect to the center of the fork, but it wasn’t compatible with my fork, so I ended up adding struts to the side racks. This configuration is sturdy and stable.
These front racks are compatible with my detachable baskets. I haven’t ridden around with the baskets on front, as I suspect they might interfere with steering more than other loads, but it’s nice to know I’ve got four hardpoints if I need them!
Posted on Monday, July 27th, 2009. Tags: bike.
Map Layout with QGIS
I haven’t tried using Quantum GIS in a few years, but Frank Donnelly has posted a thorough review of a thematic map he created with the current version of QGIS (1.02). By all indications, the program has progressed considerably since the last time I tried it. This is good news because it means free software is becoming a viable alternative for many thematic mapping tasks:
Despite a few quirks (what software doesn’t have them), I was really happy with the end result and find myself using QGIS more and more for making basic to intermediate maps at work. Not only was the print composer good, but I was also able to complete all of the pre-processing steps using QGIS or another open source tool.
Frank’s review of map elements reminds me of my own introductory cartography course. Incidentally, my TA had a petulant fetish for grotesque north arrows. Anyway, it’s nice to see New York dressed up in some fancy duds (compared to the county boundaries with which I’m most familiar, of course).
Posted on Sunday, July 12th, 2009. Tags: geography.
Logging in to the BU VPN
BU offers a virtual private network that allows users to connect to the campus network (and to the internet through the campus network) from at home or around the world. Reasons to do this include accessing files on the office computer or retrieving articles from journal sites that restrict access to subscribing institutions.
Here’s how to set up this sort of connection on your Mac. (I understand the procedure is very similar in Windows.) Go to ssl.binghamton.edu and log in using your standard username and password. Select the PODS domain unless you’re certain another option is appropriate for your account.

Signing in to ssl.binghamton.edu. Select the PODS domain.
You can access a variety of accounts and services directly through this web page, but to channel all of your computer’s network traffic through the campus network, click the Network Connect Start button.

Signed in. Click the Start button next to Network Connect.
The Network Connect utility is installed automatically. You may be prompted to allow this bit of black magic.

Allow Java to get up in your stuff.
It may take a moment for the program to download.

Wait for the connection utility to download and install.
Soon the Network Connect utility will run. Now you are connected to the campus network! You can access shared folders or servers hosted on individual machines invisible to the outside world.

Connected!
Logging in to ssl.binghamton.edu is necessary only to install the Network Connect utility. From now on, you can connect to the VPN by running the utility directly. (It will prompt you for the same login credentials.)

From now on, connect just by launching Network Connect.
Questions? Corrections? Related ideas?
Posted on Wednesday, June 24th, 2009. Tags: mac.
Doing It Right
Inspired by a post on Beany’s blog (one of many neat bicycle sites I’ve discovered recently), I spent some time this evening cleaning my chain:

Freshly cleaned chain. Before cleaning it was black with grime!
A few days ago I tried cleaning the chain while it was on the bike, but it wasn’t very effective. So, tonight I took the chain off the bike, put it in a tub (which may or may not have been my bath tub) with a strong mix of water and degreaser, and scrubbed it thoroughly with an old toothbrush. Rinsed, dried, and lightly lubricated; now it’s back on the bike and ready for action!
General principle: if you rely on it regularly, it’s worth maintaining properly.
Posted on Wednesday, June 24th, 2009. Tags: bike.
Neighborhood Quality
Although I will be unable to participate in the presentation I alluded to last week, I am happy to report it proved quite feasible to prepare a package of example data in Google Earth format. I have provided a single self-contained KMZ file to my colleagues. It contains a variety of map overlays organized in folders, including labels and some descriptive annotations.

Neighborhood quality as perceived by resident students.
The interpolated surface in the screenshot above depicts the results of a survey assessing middle and high school student perceptions of neighborhood quality. My house lies just inside a hot spot. I look forward to plotting the results of the most recent edition of this survey. We’ll test the landlady’s opinion about neighborhood decline!
Posted on Tuesday, June 23rd, 2009. Tags: geography.
FastScripts 2.4
Daniel Jalkut has updated FastScripts, my utility of choice for running scripts or opening favorite files with a keystroke or a trip to the menu bar.

My FastScripts menu, as it appears in the Finder.
Notably, there is now just one version of FastScripts, which may be used for free or upgraded to allow more than ten keyboard shortcuts.
Posted on Monday, June 22nd, 2009. Tags: applescript, fastscripts, mac.
Rudimentary Legends
In yesterday’s experiment with choropleth maps in Google Earth, I acknowledged the lack of classification legend. I used the Layer to KML conversion tool in that example, but today I tried the Map to KML tool. It includes certain map layout objects like legends.

Rudimentary legend generated by Map to KML conversion tool.
I don’t care for the way it looks, and it certainly needs clearer labels, but it’s a legend. The legend won’t appear in Google Earth if it was converted to graphics in ArcMap, so keep in mind that Map to KML will only preserve some elements.
Posted on Friday, June 19th, 2009. Tags: geography.