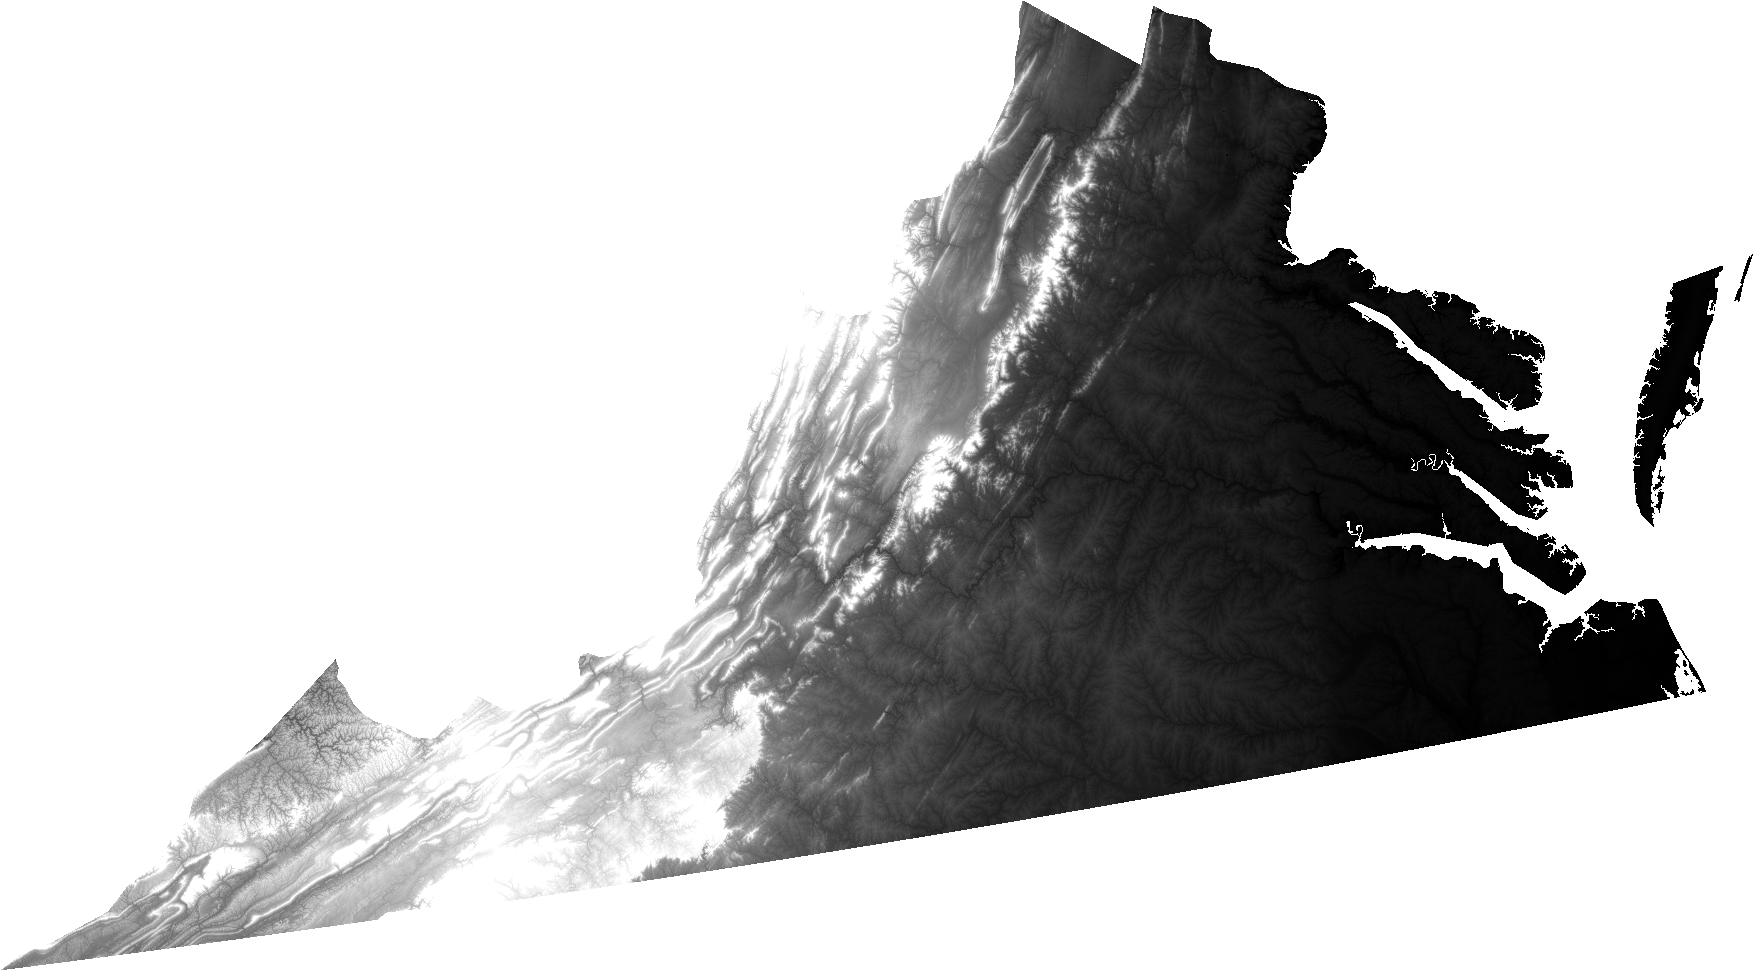
Creating Heightmaps of Large Regions
An open question from Josh Ajima about making 3D printable models of Virginia prompted me to consider the general problem of finding a suitable elevation dataset for a large region like a state.
@DesignMakeTeach Here’s a start. (https://t.co/qS9F9kWMeQ clipped to state boundary & saved at quarter res. in QGIS) pic.twitter.com/hmwwX7dj6U
— Jim (@anoved) September 28, 2015
In this post I will explain how I made the image I posted in reply, using free tools and data.
Posted on Tuesday, September 29th, 2015.
Adjustable Phone Clamp and Assembly Animation
I made some parts to combine a length of ½” PVC and a tripod into a mount to hold my phone in any position over my desk or workbench. (This could be useful for recording more timelapse drawing clips…) The ball joint clamp design is inspired by a commercial dashboard mount but redesigned to be easily printable without support. Find the files and more details on Thingiverse, including an easily customized version of the phone clip for compatibility with other devices.
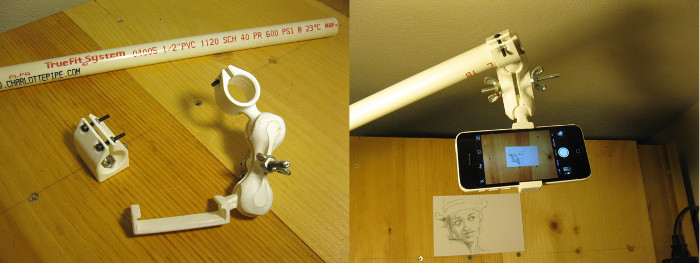
I designed the parts with OnShape. To date I have been focused on learning how to draw within Part Studios. After designing and printing these, I decided to see if I could connect them in an Assembly. To my surprise, it worked, despite having known nothing about mate connectors while drawing the parts. Pretty neat to be able to explore mechanical interactions in software.
Posted on Monday, September 28th, 2015.
Ink Brush
I tried something new: drawing with India ink and a brush instead of a pen or pencil. I like being able to lay down shadows so fast and loose.
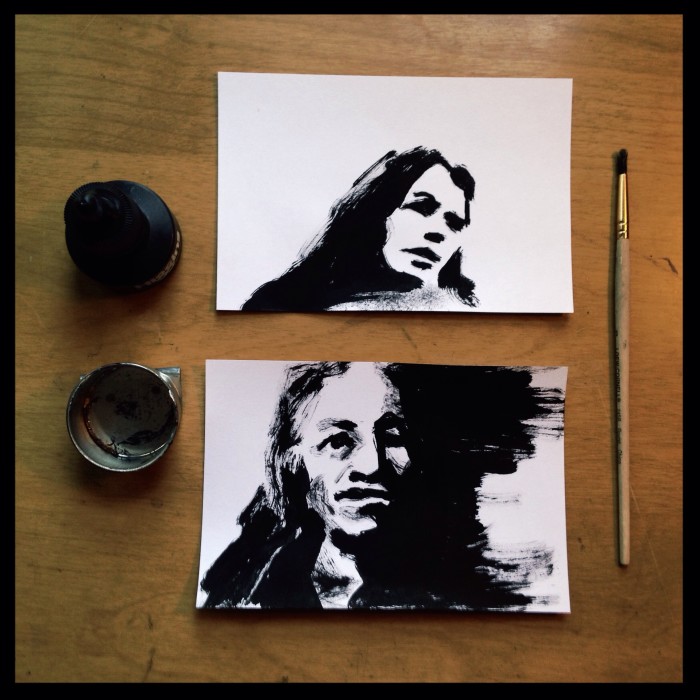
I posted a few others on Instagram, too.
Posted on Tuesday, September 8th, 2015.
Conserving Onshape Document Size
A useful feature of Onshape is revision history, allowing you to inspect or restore any previous state of your design. Reasonably enough, complex revision histories can easily inflate the storage size of your documents – especially if, like me, you learn by making a lot of trial and error modifications to your work-in-progress parts. Although I think the free plan is generous, it does have limits, so document size can become a concern.
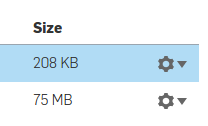
For example, here are the sizes of two designs of similar complexity. One is a buckle and the other is a fan plate. The latter is only slightly more intricate than the first (and very simple indeed by professional CAD standards), yet it weighs in at 75 megabytes compared to only 208 kilobytes. That’s useful data for a product or project where the provenance of each change is important, but in this case I know the revision history is mostly junk because it contains hours of doodling before I figured out how to achieve the final design.
So what can do if you want to reduce a document’s size and you know you don’t need all the dust swept under the revision history rug? Barring any overlooked or unimplemented history management features, you can copy a fresh instance of a part studio into a new document. It turns out that doing so discards the revision history and can thus greatly reduce document size. (The feature list steps actually used to create the part are, of course, retained.)
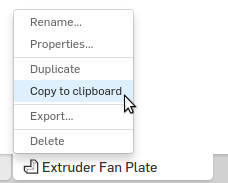
First, right-click the part studio tab in question and select Copy to clipboard. (This is some sort of “cloud” clipboard, not your system clipboard.)
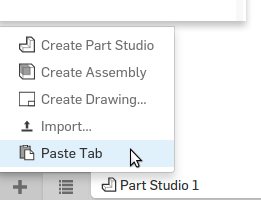
Next, create a new document. Click the new tab button and select Paste Tab. Now you’ve got the same part you started with, minus embarassing memories of mistakes made during its initial design.

Size comparison: the fresh copy of that 75 megabyte design is only 1 megabyte.
Posted on Sunday, September 6th, 2015.
Making Extruded 3D Models of Inkscape Illustrations
So, you have some vector artwork in Inkscape and you want to make it into a stamp or some other sort of 3D-printable gewgaw. Here are two ways to give your paths some depth. One uses Onshape for an interactive approach. The other uses OpenSCAD for a more programmatic approach. Both are parametric, permitting subsequent revision without restarting from scratch.
Posted on Thursday, August 20th, 2015.
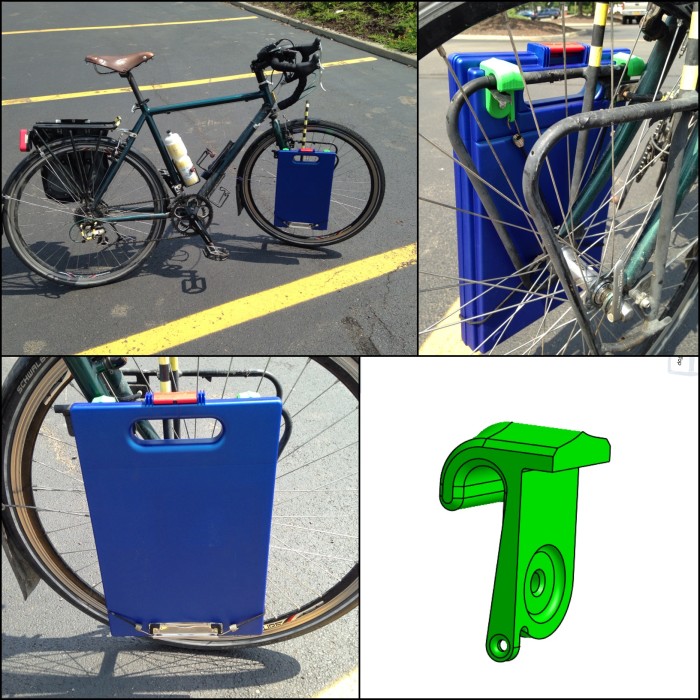
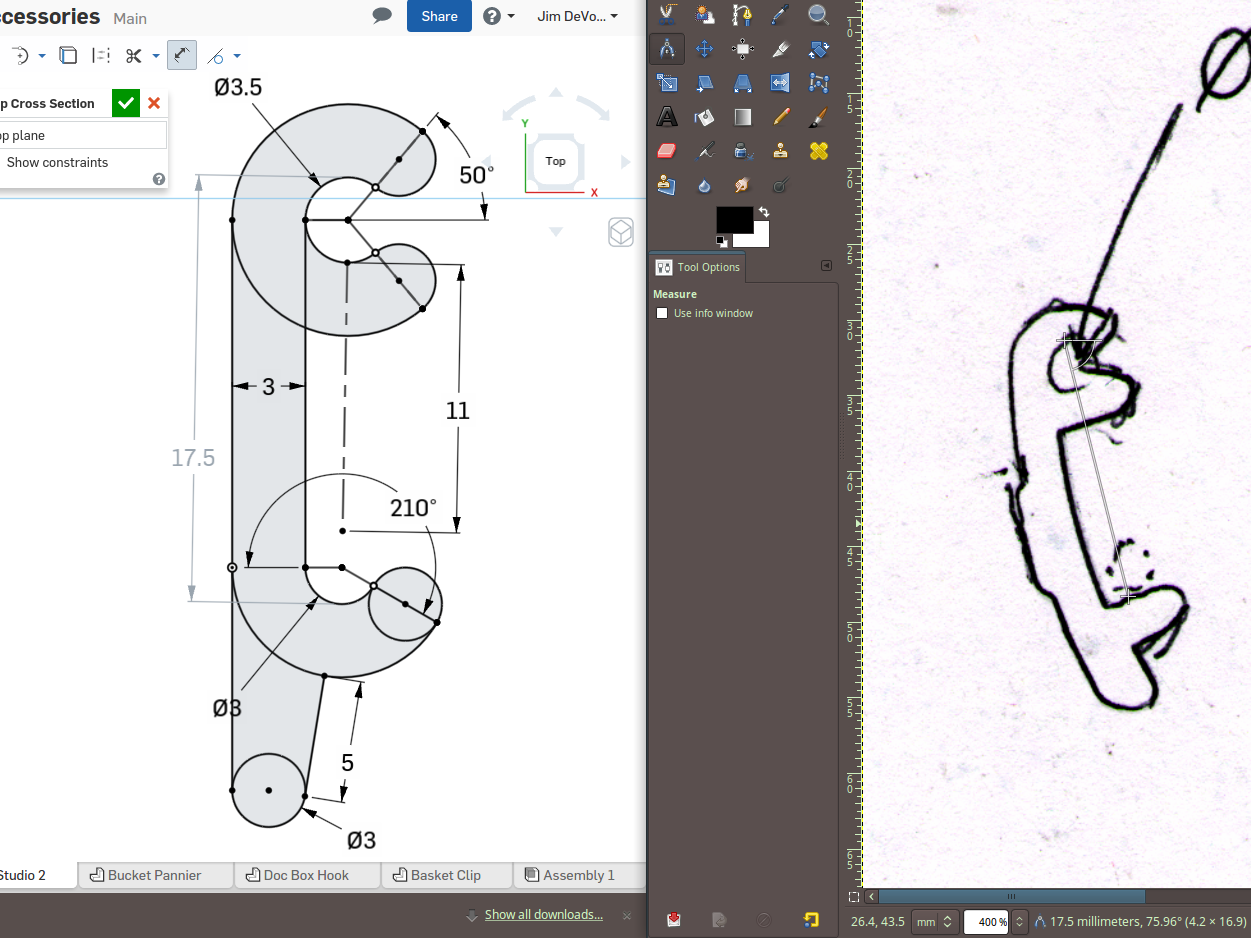
Clipboard Case Pannier Hooks
Found this clipboard document case at Staples and turned it into a compact clamshell pannier.
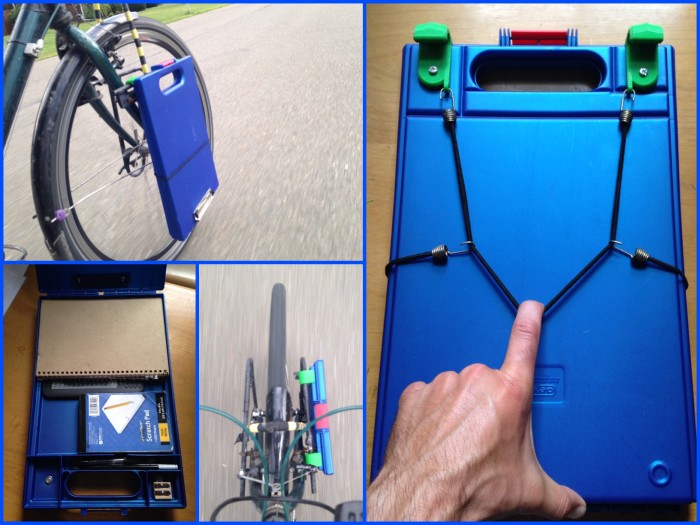
Find the printable STL files for the green hooks as well as a few more photos and details at Thingiverse. Alternatively, fork or view the parametric model at Onshape.
Bonus image: sketching a stronger clasp, using a scanned paper trace of the original as an admittedly not very useful reference:
Posted on Tuesday, August 18th, 2015.
3D Printing a Stamp of a Drawing
Here’s an original marker doodle and the digitized version I made with Adobe Shape CC:

I opened the SVG file in Inkscape and converted the paths to extruded polygons with paths2openscad by Dan Newman. I added a solid base and printed the model as a simple stamp.
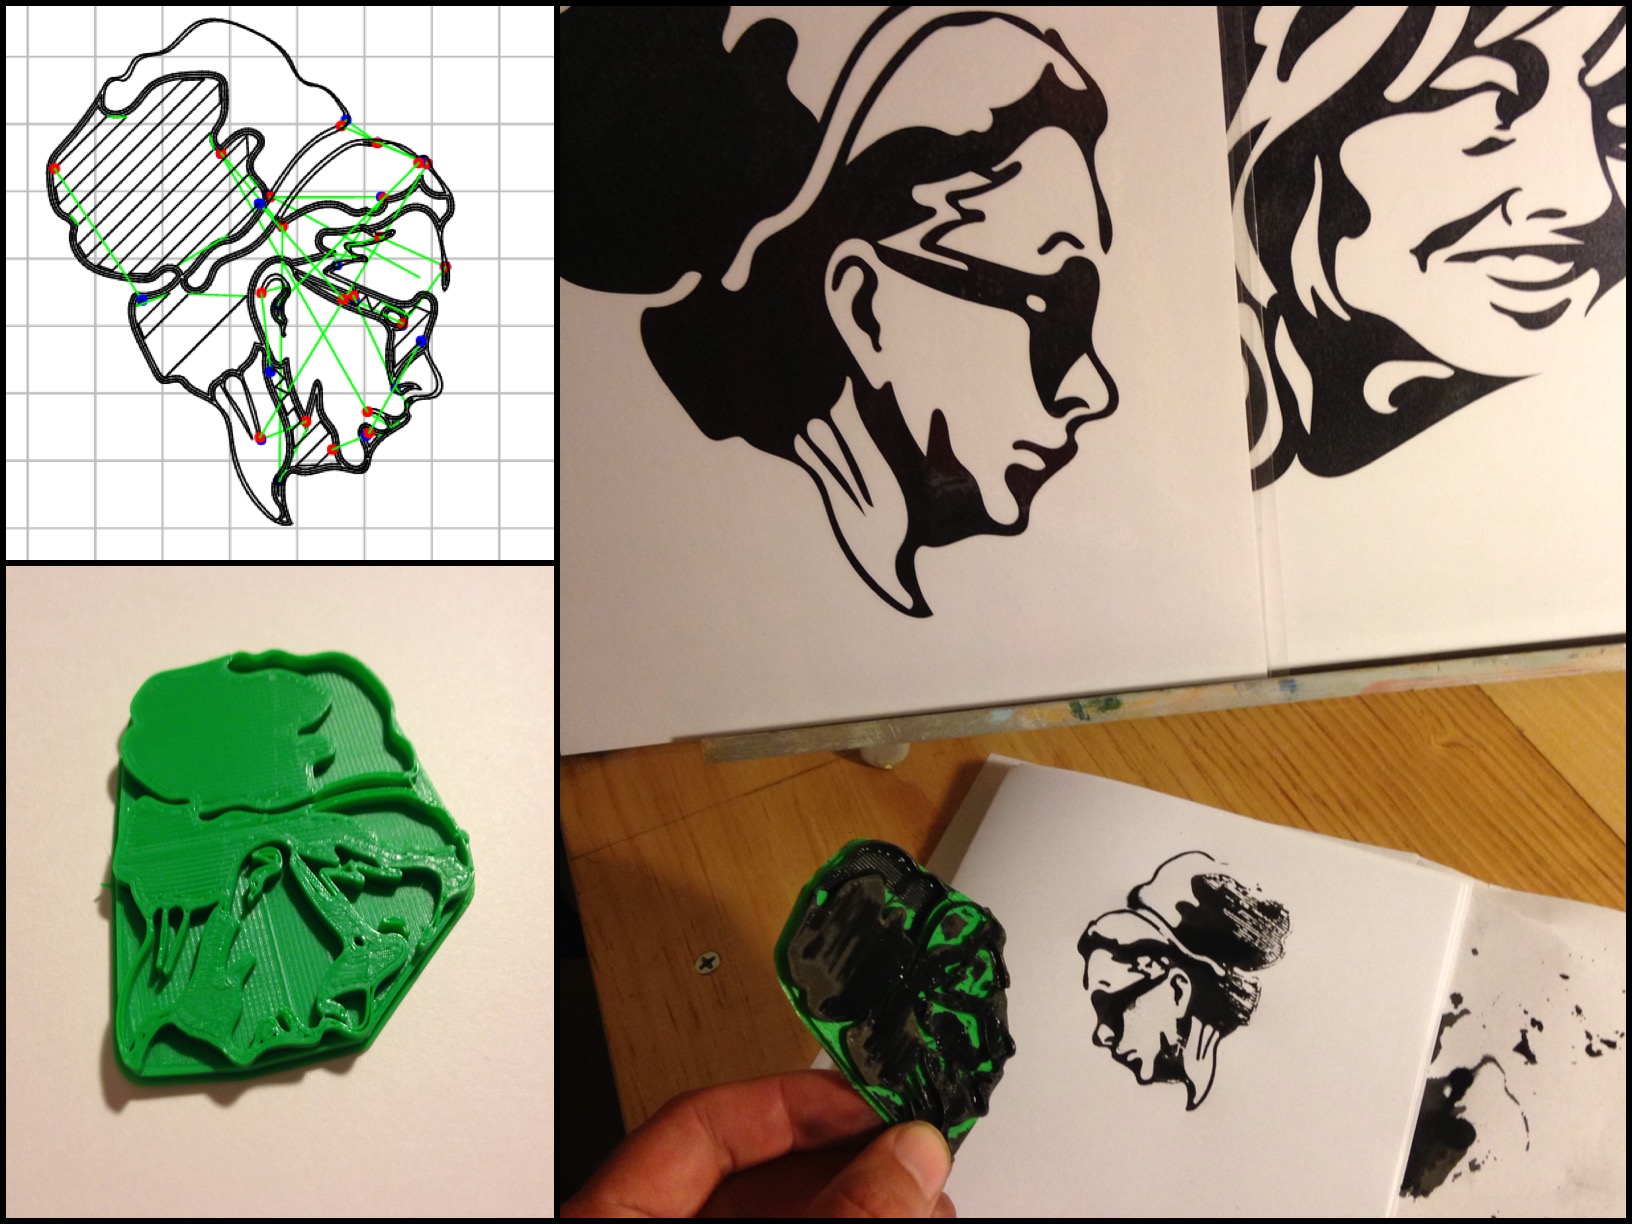
It doesn’t work great, but it does work! I’m brushing India ink directly onto the stamp. The printed PLA plastic is not an optimal surface for holding or transferring ink, as it tends to either blot or bead and run off. Here is the best print I was able to make in about a dozen tries:

Posted on Saturday, August 15th, 2015.
The hobo’s guide to exporting vector graphics from Adobe Shape Creative Cloud
Adobe Shape CC is a free mobile app for vectorizing high contrast images. It’s good for generating crisp graphics from sketches. (See my prior post on a similar process using old school tools.) You can export the results as an image directly from the app or retrieve images as free assets from Adobe Creative Cloud. However, to access editable vector versions of your designs, you need a paid Creative Cloud subscription and/or Adobe’s desktop software.
Sort of.
Using a modern desktop browser, right click an asset thumbnail and select Inspect Element to poke around the associated code in the browser’s developer view. Locate and copy the associated background-image URL:
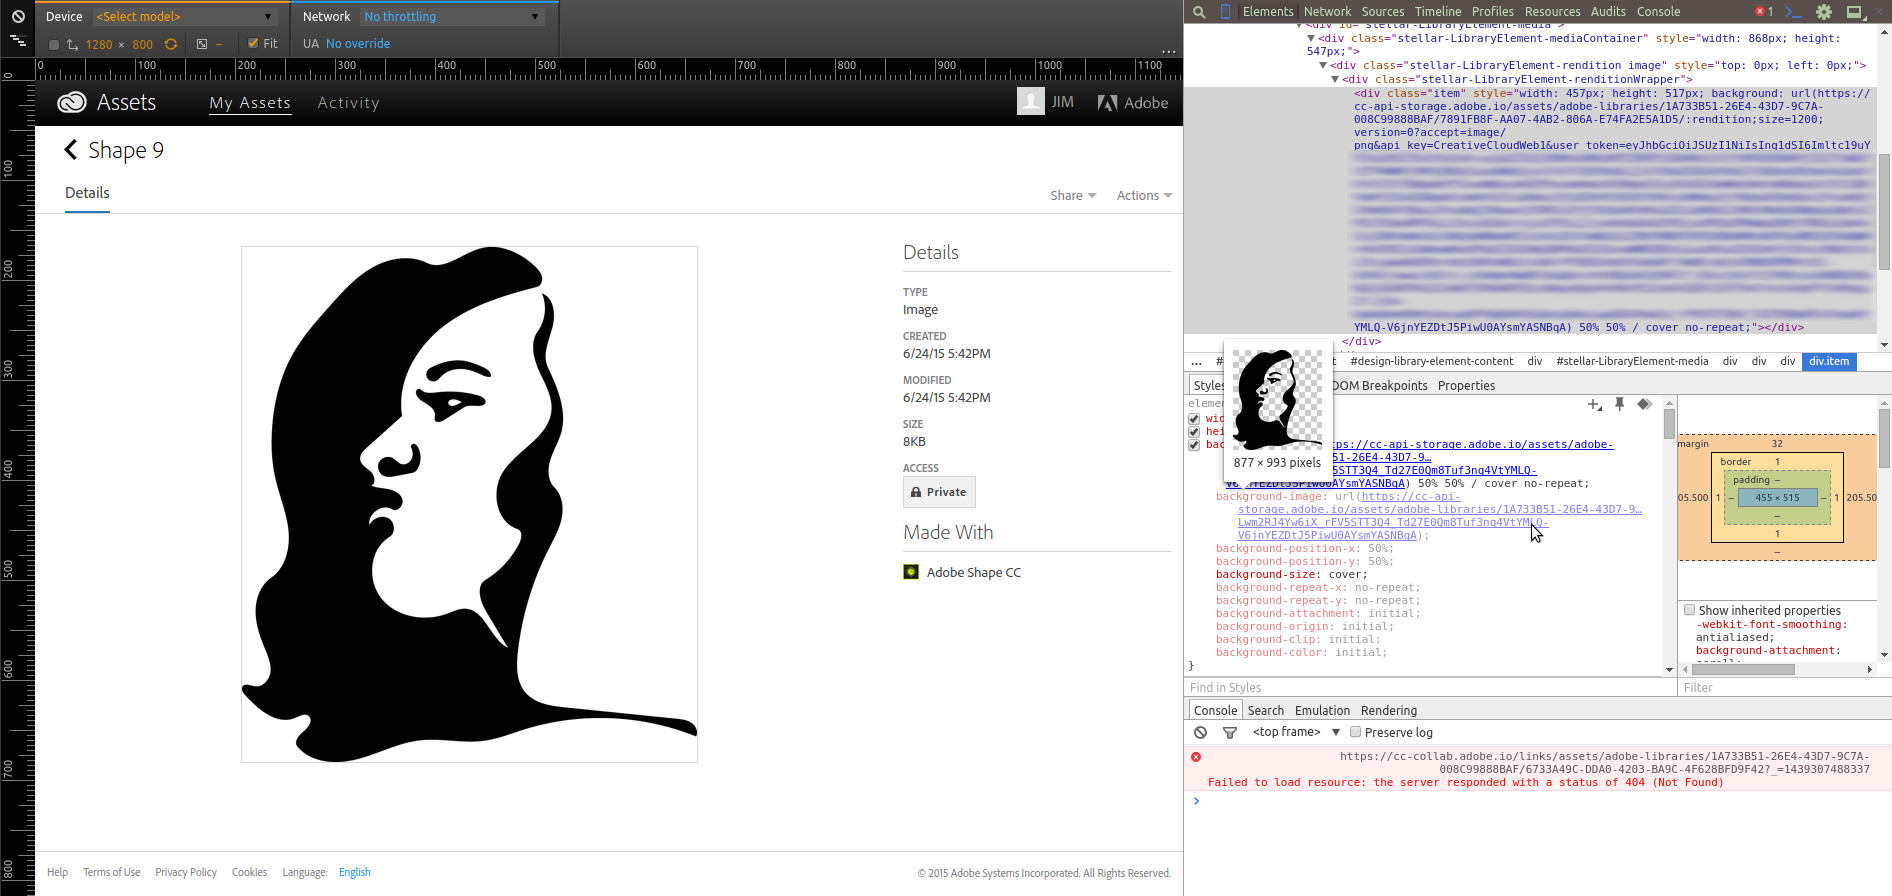
This URL requests a PNG image based on the underlying shape. However, you can edit the URL to retrieve the raw SVG of your artwork. Initially, the URL will look something like this:
https://cc-api-storage.adobe.io/assets/adobe-libraries/[ASSET_ID]/:rendition;size=200;version=0?accept=image/png&api_key=CreativeCloudWeb1&user_token=[USER_ID]
Delete the underlined portions to locate the vector version. You may need to use your browser’s Save As feature if the SVG is displayed instead of downloaded. Be careful to retain the long ID strings and the question mark delimiter (?). Now you can revise the vector artwork you created on the go using a free program like Inkscape.
Here’s a hint to roll your own browser bookmarklet to do this with one click:
Posted on Tuesday, August 11th, 2015.