Tag Archive: “LEGO”
Translucent Parts Lists in LPub
Inspired by a preview instruction image posted by GreenLead, here is a guide to creating parts lists with translucent backgrounds in LPub.
Start by opening a model in LPub. I’m using this one.

Go to LPub’s Configuration menu and select Page Setup. Choose Picture as the Background type and select a file (thanks to Hubble for the nebula image in this example).

Now the page background is in place. Don’t forget that some images make better backgrounds than others. This example is a bit dark, making it hard to see the assembly details in some places.

Next, return to the Configuration menu and select Parts List Setup. Select Picture as the parts list Background type and choose your background image (here is the simple transparent white image I’m using).
In this case, it doesn’t matter whether you choose Stretch or Fill, but if your parts list background has some texture or text you may prefer one over another. However, I think there is a currently a bug in LPub that causes the parts list border to be stretched or cropped along with the background, so for now you’ll probably want to select Borderless as the Border type.

Now the page background is partly visible through the tinted parts list backgrounds. No post-export image editing necessary! Note that you can also modify individual parts lists backgrounds one at a time by right-clicking them.

I hope this gives you some ideas for new things to try with your custom instructions.
Posted on Thursday, February 11th, 2010.
Online LDraw Viewer

Click here to view some digital bricks right in your browser.
It’s a quick late-nite first-draft online adaptation of the Processing LDraw viewer I’ve been playing with.
Posted on Tuesday, January 12th, 2010.
Setting up Andy’s LDraw Viewer
Andy has posted the Processing code for the nifty little LDraw viewer I mentioned in my previous post.
Processing gives you a decent among of guidance, but for your reference here’s what I did to get this up and running:
- Download and unzip
ProcessingLcad-Oct2008.zip. - Rename the
LcadTest-Oct2008folder toLcadTest01in order to match the project file it contains. - Move the contents of the
LcadTest01/libs/folder to your Processing sketchbooklibrariesfolder. In my case, it is/Users/anoved/Documents/Processing/libraries/. - Move the contents of the
LcadTest01/models/folder to themodelssubfolder of your LDraw library. Alternatively, you can editLcadTest01.pdeto load a model of your choice. - Open
LcadTest01.pdeand editBaseDirto identify your LDraw library folder. In my case, it is/Users/anoved/Documents/LDraw/.
Lastly, if the capitalization of the LDConfig.ldr file in your LDraw library does not match that specified later in LcadTest10.pde, edit one or the other so they are in agreement.
Now you can take it for a spin. And, yes, this viewer can load files with Unix line endings. ☺


Posted on Monday, January 11th, 2010.
Beginning Processing
Processing is a system that makes it as straightforward as possible to do some pretty sophisticated graphics programming. Based on Java, it abstracts enough technical details to let you focus, more or less, on the basic logic of the idea you want to animate. From the web site:
It is used by students, artists, designers, researchers, and hobbyists for learning, prototyping, and production. It is created to teach fundamentals of computer programming within a visual context and to serve as a software sketchbook and professional production tool.
Check out the Exhibition for some examples of what’s possible and the Tutorials to see how easy it is get started. There is a great collection of examples for specific topics, too, most of which include illustrative applets embedded in the page. The ability to export Processing programs (or “sketches”) as applets is particularly appealing, although my understanding is that some features, such as file I/O, are available only in application or development mode. It works cross-platform.
I know I have encountered Processing before, but my current interest began as I read Andy Lynch’s description of a simple LDraw renderer he implemented as a Processing sketch. That lit a fire under some related ideas of my own that have been simmering for want of an optimal outlet.
But there’s more to my interest than digital bricks: if there isn’t already a decent library (which would be surprising, as many useful libraries seem to be available), I might be tempted to write a shapefile loader, if for no other reason than to complement the shapefile parser I once wrote for Chipmunk Basic. I think it could be fun to experiment with some raster GIS and remote sensing ideas in Processing, too. (Just get the spectral signatures – click, click, click – and you do it. That’s all what it is!) Last but not least, per its original intent, I can envision using Processing as a superior tool to visualize certain data.
What sort of Process will you invent?
Posted on Monday, January 11th, 2010.
LDraw Files, Line Endings, and an Ecosystem Inventory
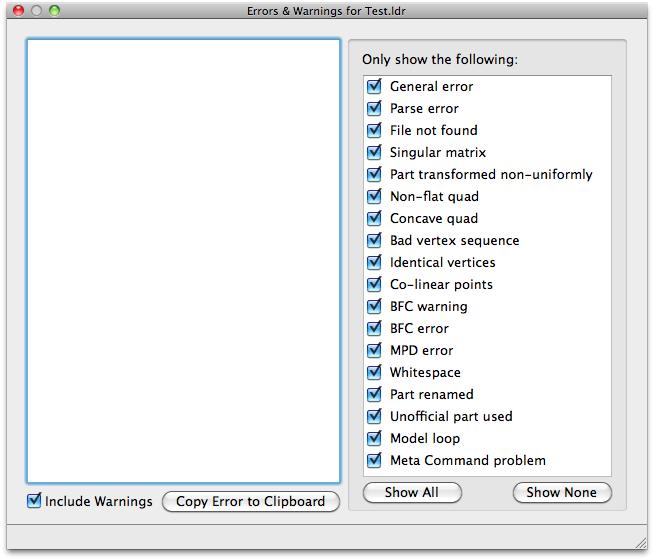
The general LDraw File Format specification is silent on the matter of line endings, but the File Format Restrictions for Official Parts requires DOS/Windows (“CRLF”) line endings. A recent discussion caused me to become curious whether there are really any contemporary compatibility reasons for this recommendation. So, I decided to take an inventory of LDraw programs to see which, if any, had trouble opening files formatted with Unix (“LF”) line endings.
![]()
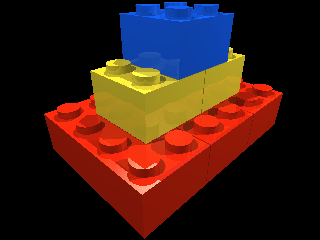
Here is a simple sample model, Test.ldr. It was created with Bricksmith, which outputs files with DOS line endings per the official file format restrictions. I used a text editor to convert the line endings to Unix format.
![]()
What programs can read the test model?
Bricksmith 2.3.1 can do it.

LDView 4.1 can do it (with no warnings or errors).

LPub 4.0.0.4 can do it.

L3Lab 1.3 Beta can do it.

ldglite 1.0.18 can do it.

Mac Brick CAD 3.0b1 can do it.

BrickDraw3D 0.5b can do it.

LeoCAD 1.75 for Linux can do it.

LeoCAD 1.75 for Windows can do it.

LDraw Design Pad 1.5.7 can do it.

MLCad 3.2 can do it.

LD4DStudio 1.1 can do it.

LDLite 2.4 can do it.

SR 3D Builder 0.4.5.7 can do it.

LEGO Digital Designer is not strictly part of the LDraw system of tools, but LDD can import it, too.

Command-line tools like L3P 1.3, LDTrim 1.1, and LSynth 3.1 can do it (there’s nothing for LSynth to synthesize in this case, of course).
l3p Test.ldr → Test.pov → povray Test.pov → Test.png
ldtrim -in Test.ldr -out Test-trim.ldr
lsynthcp Test.ldr Test-synth.ldr
As a sample of Philo’s LDraw tools for part authors, I modified some of the example files included with Coverer to use Unix line endings.
coverer arc1.dat arc2.dat myarcoutput.dat
The program ran without any trouble.
![]()
James Jessiman’s original LDRAW and LEDIT programs (downloadable here) can’t do it – but they’re worth celebrating anyway, so here’s a screenshot of LEDIT looking at the DOS-formatted version of the test model:

I could not find a downloadable copy of LDAO (LDraw Add-On) to test. According to the discussion that inspired this inventory, it too is at least partly dependent on DOS line endings.
![]()
With the exception of the inimitable original, none of the many LDraw programs I could test had any trouble interpreting files formatted without DOS line endings.
My conclusion is that the official part file format recommends DOS line endings solely for backwards compatibility with the program that inspired the system. This is not bad, but it’s worth recognizing. As long as there is no inconvenience to other programs or their users, I see no reason to abandon this situation. We have a format that preserves compatibility with older components, and tools that are robust enough to understand reasonable exceptions to the format.
Anyway, here’s a hearty pat on the back for the folks who have made so many nifty ways to play with virtual bricks.
Posted on Friday, January 8th, 2010.
LSynth 3.1 for Mac OS X
I have compiled a Mac OS X version of LSynth 3.1, the recently released update to the program that synthesizes LDraw code for flexible LEGO parts.
Download LSynth 3.1 for Mac OS X 10.5+ (Universal Binary; 85 KB)
This download includes the lsynthcp executable as well as the configuration file (.zip) and the constraint parts (.zip) available at Willy Tschager’s installation tutorial page for MLCad users (which contains some useful information for all LSynth users).
Important Compatibility Note: The executable in the above download may only work with Mac OS X 10.5 (Leopard) or greater. Click here to download a version of lsynthcp that should also be compatible with Mac OS X 10.4 (Tiger), provided by current LSynth developer Don Heyse. Thanks, Don!
Installation
Copy the LSynth constraint parts to the parts/ or Unofficial/parts/ directory of your LDraw part library. Keep the lsynth.mpd configuration file in the same directory as the lsynthcp executable. LSynth is not integrated with Bricksmith, so you can keep these files wherever you prefer. You will need to use the command line to run LSynth.
Usage
To use LSynth, you manually place constraint parts at key locations such as the endpoints of a hose. Then you input the LDraw file to lsynthcp, which generates a duplicate file containing all the hose segments, chain links, etc. necessary to represent the flexible part described by the constraints.
For example, here is the RUBBER_BAND-Constraints.ldr file from Willy’s excellent page of LSynth examples:

With the file in same directory as lsynthcp and lsynth.mpd, run the following command:
./lsynthcp RUBBER_BAND-Constraints.ldr Rubber_band_output.ldr
Here is the output:

For more detailed information about using LSynth, peruse Willy’s troubleshooting page and the pages linked above.
Notes
Here are the minor modifications I made to compile the LSynth 3.1 source package for Mac OS X:
- Edit the comment on Line 69 of
lsynthcp.cto begin with slashes (//) instead of backslashes (\\). - Append “
-arch i386 -arch ppc” to lines 3 and 17 ofmakefileto enable Universal Binary support.
The make command is sufficient to compile the program.
This release supersedes the LSynth Service I made a few years ago.
Posted on Saturday, November 21st, 2009.
In which I present alternate model building aptitude as a marketable career skill
From the NYT article on Lego’s business recovery:
The changes [that optimized the company’s supply chain] also filtered down to the ranks of Lego’s toy designers, says Paal Smith-Meyer, head of Lego’s new-business group. The number of different bricks or elements that go into Lego toys has shrunk to less than 7,000 from roughly 13,000, and designers are encouraged to reuse parts, so that a piece of an X-wing fighter from the “Star Wars” series might end up in Indiana Jones’s jeep or a pirate ship.
There’s an emphasis on the creative reuse of limited parts in the design of current Lego sets. Someone who demonstrably makes that specific challenge the focus of their hobby would be an asset to the company.
Posted on Sunday, September 6th, 2009.
LDraw and “Multitouch Augmented Reality”
An upcoming version of the library behind the SSTT Visualizer used in LDraw Augmented Reality will support multitouch input, allowing your fingers to be recognized as input devices. It looks like you can use gestures to operate virtual/visual controls like sliders along the side of the marker image. Here’s a video of examples:
A variant of my Scout model appears near the end of the video. Neat!
Posted on Tuesday, September 1st, 2009.
Unofficial build of LDView 4.1 (with 3DS export)
My introductory guide to LDraw Augmented Reality relies on LDView’s 3DS export feature, which is currently present only in unreleased development versions of LDView.
Here is an unofficial Macintosh build of LDView 4.1 (code retrieved from Sourceforge on 31 August 2009). It includes 3DS export. Hopefully this helps a few more people get started with LDraw and SSTT Visualizer.
Download LDView-Unofficial.zip (Intel Mac OS X only) 1MB
Update: A formal beta version of LDView 4.1 has been released.
Posted on Monday, August 31st, 2009.
LDraw Augmented Reality
Step 1
Create an LDraw model using Bricksmith or some other LDraw editor.

I use LDraw to record the design of models I’ve built. Here are the originals:

Step 2
Open the LDraw model in LDView.

(Note: as reported in the comments, 3DS export is not available in LDView 4.0.1, the most recent stable release. For the time being, you’ll need to build LDView yourself to utilize this feature.)
Choose Export from the File menu. Select “3DS: 3D-Studio File” from the File Format popup menu.

Name the file and click Save.
Step 3
Download the SSTT Visualizer Augmented Reality Demo from technotecture.com. Models, fiduciary marker images, and configuration files are stored inside the visualizer application package. Right-click the application and select Show Package Contents:

Drag the model you saved in Step 2 into the Contents/Resources/sstt subfolder:

Step 4
Edit the config.txt file.
fiducial sstt/watch_fiducial.jpg 80 52
translate 0 0 0
model sstt/model.3ds 0.26
Consult the visualizer User Manual for more details about the syntax of this file. Here’s a line-by-line explanation of the example:
fiducial sstt/watch_fiducial.jpg 80 52
This identifies the tracking image from which the model’s position and orientation should be derived – the model will appear above this image (the default) wherever it appears in the scene.
translate 0 0 0
The translate statement can be used to adjust the position of the model relative to the image. Increase the last coordinate to elevate the model above the image surface or to compensate if the origin of your LDraw model is above or below the point where it should contact the ground.
model sstt/model.3ds 0.26
This line identifies the model to display. Adjust the number to change the apparent display size of the model. A scale factor of 0.26 seems to work well with the default tracking image printout.
Step 5
Print out the tracking image sheet (PDF), start the SSTT Visualizer program, and point your computer camera at the sheet. It may take a moment for larger models to load.
As you may notice, it lags a little sometimes, but I’d say it’s still pretty neat. It may prove possible to optimize the 3DS files for smoother performance, as there is a lot of internal part and model geometry that is unnecessary in this context.
Posted on Saturday, August 1st, 2009.